LOW-FI PROTOTYPING: QUICK EXCHANGE KIT
LESSON SNAPSHOT
| Kit | Quick Exchange Kit - Student Guide #8 |
|---|---|
| Client | Sofia Gonzalez, Age 16 - Needs a system to rapidly test and optimize lab workspace configurations due to cerebral palsy affecting fine motor control |
| Core Concept | Co-design methodology through rapid prototyping and low-fidelity testing |
| Prerequisites | Basic Smart Servo operation (Kit #1), experience with assembly and mounting systems (Kits #2-7) |
| Student Guide | Available at WagnerLabs.net/SmartServo |
⚠️ Safety Considerations
- Sharp tools: Use caution when poking holes in cardboard with screwdrivers—always direct the tool away from your body and hands
- Thread tapping: Secure parts firmly to prevent slipping when tapping threads
- Magnetic connections: Test magnetic connections at low power before full operation to ensure secure attachment
What This Kit Teaches
Engineering/Design Focus: This kit introduces iterative prototyping methodology and co-design practices. Unlike previous kits that solve defined problems, this kit teaches how to discover solutions when the optimal configuration is unknown. Students learn to create low-fidelity prototypes that enable rapid testing cycles, transforming abstract workspace challenges into tangible experiments. The magnetic coupling system demonstrates how removable interfaces accelerate the design process by allowing quick exchanges between prototype variations.
Human-Centered Design Connection: Sofia can articulate her problem clearly but cannot visualize solutions until she physically experiences them in her actual workspace. This kit embodies authentic co-design where the engineer provides divergent exploration through multiple prototypes while the user provides convergent evaluation through real-world testing. Students learn that the goal isn't immediately building the "right" solution but creating a discovery process that reveals what works through collaboration.
Standards at a Glance: Primary domains are HCD, STEL, CAD, NGSS - See appendix for complete alignment
MATERIALS & PREPARATION
What Students Need:
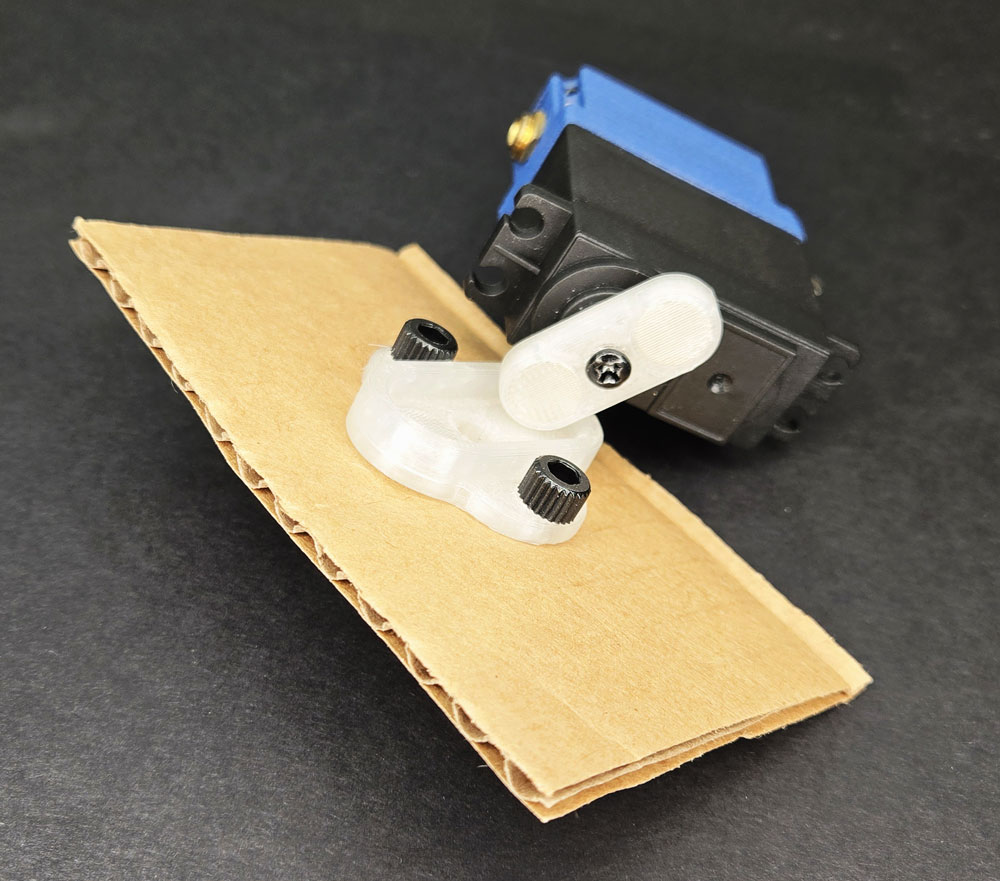
- Kit components: Nylon M5 Socket Head Screws, Magnetic Coupling, Magnetic Servo Horn, Mounting Plate
- From previous kits: Smart Servo, 4mm Allen Key, Phillips Screwdriver, M5 Tap with Tap Handle, Testing Button, Power supply
- Additional materials: Cardboard (corrugated preferred), pen or marker
- Safety equipment: Work surface protection, eye protection if available
What You Need to Prepare
- Pre-build one kit to identify clearance issues and test magnetic coupling strength
- Test cardboard types - corrugated works best; ensure it's thick enough to hold threads but not so thick students can't poke through
- Prepare cardboard samples - pre-cut rectangles (approximately 6" x 6") save time and reduce waste
- Review student guide pages on co-design methodology and divergent/convergent thinking
- Set up workstations with organized materials including cardboard scraps for experimentation
- Prepare prompting questions about Sofia's workspace challenges to guide initial prototype brainstorming
- Identify space for testing prototypes with movement (magnetic connections can fail if bumped during operation)
Quick Troubleshooting Reference
| If students struggle with... | First, check... | Then try... |
|---|---|---|
| Cardboard tearing when poking holes | Hole placement near cardboard edge or weak spots | Use screwdriver to expand hole gradually rather than forcing through; reinforce area with tape on back side |
| Tapped threads not holding screws | Insufficient tapping depth or cardboard too thin | Tap completely through; add second layer of cardboard; or use slightly shorter screws |
| Magnetic coupling too weak | Coupling not fully seated against cardboard | Ensure screws are tight; verify magnets are aligned properly; test with lighter loads initially |
| Difficulty generating diverse prototypes | Converging on one idea too quickly | Require 3-5 sketches before building anything; use "worst possible idea" brainstorming to break fixation |
ESSENTIAL TEACHING MOMENTS
Key concepts worth pausing to discuss during the lesson
Moment 1: Why Cardboard? The Power of Low-Fidelity
Student Guide Reference: Steps #4-7 (Creating cardboard mounting plates)
Core Idea: Low-fidelity materials like cardboard accelerate learning by removing psychological commitment to any single design direction.
Why It Matters: Professional designers deliberately use rough materials during exploration phases because expensive or time-consuming prototypes create pressure to "make them work" even when testing reveals problems. Cardboard's disposability enables freedom to fail fast.
Discussion Prompts to Consider:
- "Why might using 3D printed parts too early actually slow down the design process?"
- "What would change about your willingness to try a radical new idea if you'd already spent five hours building the previous version?"
- "How does the cost and time investment in a prototype affect your objectivity when evaluating it?"
Watch For: Students who want to skip to "finished" solutions or feel that cardboard prototypes aren't "real engineering." Help them see that exploration is just as rigorous as refinement—it's a different phase with different goals.
Moment 2: The Magnetic Interface as Design Tool
Student Guide Reference: Steps #8-10 (Installing and testing magnetic coupling)
Core Idea: The quick-release mechanism isn't just a convenient feature—it's a deliberate design choice that enables rapid iteration cycles by reducing the friction between testing different configurations.
Why It Matters: Engineers must design not just products but also the processes for developing those products. The coupling system is infrastructure that supports experimentation, demonstrating how interface design affects workflow efficiency.
Discussion Prompts to Consider:
- "How would the testing process change if each prototype required screwing and unscrewing four bolts?"
- "What other design challenges might benefit from quick-exchange systems during development?"
- "How does the 'snap-on, snap-off' interface change how many ideas you're willing to try?"
Extension Opportunity: If time allows, have students document the actual time required to swap prototypes. Compare this to estimated time for screw-based mounting. Calculate how many more iterations are possible in the same class period.
Moment 3: Divergent vs. Convergent Thinking in Practice
Student Guide Reference: "The Bigger Picture" section and entire prototyping process
Core Idea: Effective design alternates between divergent thinking (generating many possibilities without judgment) and convergent thinking (evaluating options against criteria to select the best approach).
Why It Matters: Many students default to convergent thinking immediately—picking the first "good enough" idea and refining it. This kit demonstrates why deliberately separating exploration from evaluation leads to better solutions because you can't know the optimal approach until you've explored the solution space.
Discussion Prompts to Consider:
- "As the engineer, your job is creating options for Sofia to test. How many different configurations should you make before asking her to evaluate them?"
- "Why is it important that Sofia doesn't see your prototypes until you've made several different approaches?"
- "What would happen if you built one prototype, got feedback, refined it, got more feedback, refined again—without ever exploring completely different directions?"
Demo/Visual Aid Suggestion: Show a simple diagram of divergent thinking (expanding outward like a fan) versus convergent thinking (narrowing down like a funnel). Explain that both are essential but must be kept separate—don't evaluate while generating, don't generate while evaluating.
Moment 4: Co-Design When the Solution Is Unknown
Student Guide Reference: Client profile and "Congratulations" section prompt
Core Idea: Sofia knows her constraint (equipment must be accessible when needed, out of the way when not) but cannot specify the solution because she hasn't experienced the possibilities yet. This makes the design process collaborative discovery rather than requirement fulfillment.
Why It Matters: Many accessibility challenges can't be solved by simply asking users "what do you want?" Users are experts in their experiences and constraints but not necessarily in envisioning technical solutions. Co-design acknowledges that engineers and users each bring irreplaceable expertise to a shared problem-solving process.
Discussion Prompts to Consider:
- "What questions would you ask Sofia before building your first prototypes? What questions would only make sense after she's tested some options?"
- "Why can't Sofia just tell you exactly what height and angle she needs without physically trying different configurations?"
- "How is designing with Sofia different from designing for Sofia?"
1. ENGAGE
How might we understand Sofia's challenges when the optimal solution cannot be specified in advance?
Understanding the Challenge
Learning Focus: Students understand why Sofia's challenge requires a collaborative discovery process rather than immediate solution design.
Suggested Activities
Client Introduction:
- Have students read Sofia's profile carefully, identifying what she knows (her constraint) versus what she doesn't know (the optimal configuration)
- Consider: Classroom simulation—set up a workspace that must serve two incompatible purposes (accessible storage vs. clear work surface). Have students physically rearrange items repeatedly, noting frustration and time required
- Discuss: How is Sofia's situation different from previous clients like Marcus or Maggie who could describe specific solutions they needed?
Problem Framing:
- Guide students to articulate the design challenge: "Sofia needs a way to discover which workspace configuration actually works through rapid physical testing because verbal description or mental visualization cannot reveal whether specific heights, angles, and positions will be accessible without interfering"
- Distinguish between the immediate technical task (building a quick-exchange system) and the broader methodology (creating infrastructure for co-design)
- Preview: How might testing many rough prototypes lead to better solutions than refining one idea?
Formative Assessment Ideas:
- Can students explain why Sofia can't just specify exactly what she needs upfront?
- Do they recognize this kit as teaching a discovery process rather than building a final solution?
- Can they distinguish between problems with clear specifications versus problems requiring exploration?
Standards Connection: Primary: HCD #1 (Problem Framing—recognizing unknowns), HCD #3 (Innovation Process—divergent vs. convergent thinking), STEL 1M (Creative problem-solving), STEL 7Z (Human-centered design principles)
2. EXPLORE
How do low-fidelity materials and quick-exchange interfaces enable rapid iteration?
Building & Discovering
Learning Focus: Students develop skills in rapid prototyping while experiencing how interface design affects iteration speed.
Facilitation Approach
Before Building:
- Students complete Steps 1-3 (component identification and material gathering)
- Consider: Quick brainstorming—have each student sketch 2-3 completely different workspace configurations Sofia might test (side-mounted, overhead, sliding forward) without judging feasibility yet
- Emphasize that cardboard choice matters—corrugated provides better thread retention than thin poster board
During Building (Steps 4-10):
- Students follow assembly instructions for magnetic coupling system
- Use Essential Teaching Moment #2 when installing magnetic interface—pause to discuss how this design choice affects workflow
- Watch for: Students trying to make prototypes "perfect" or elaborate. Redirect toward functional simplicity
- Encourage: Testing magnetic connection strength at various angles before declaring assembly complete
Testing & Prototyping Phase (After Step 10):
- Guide students to create 2-3 cardboard-mounted objects representing different approaches to Sofia's challenge
- Emphasize divergent thinking: generate options without evaluating them yet
- Consider: Timed challenge—"Create three completely different mounting prototypes in 15 minutes" to prevent perfectionism
- Use Essential Teaching Moment #3 to discuss the difference between generating ideas and judging them
Formative Assessment Ideas:
- Are students successfully creating secure thread connections in cardboard?
- Can they operate the magnetic exchange system reliably without detachment during movement?
- Are they generating multiple distinct prototype approaches rather than minor variations on one idea?
- Do they demonstrate understanding that rough prototypes have pedagogical value?
Standards Connection: Primary: CAD 1.2 (Design process—prototyping phase), HCD Tool 4.3 (Proof of concept building), NGSS Practice 2 (Developing and using models), STEL 2T (Physical modeling to aid decisions), STEL 7Q (Design process—prototype creation)
3. EXPLAIN
What makes co-design and rapid prototyping effective methodologies for solving complex problems?
Making Sense of Concepts
Learning Focus: Students understand co-design methodology, the role of low-fidelity prototyping in exploration, and how divergent/convergent thinking cycles drive innovation.
Suggested Sequence
Process the Experience:
- Reflection: "How did working with cardboard change your design decisions compared to 3D printing from previous kits?"
- Discuss: When did you want to stop exploring and start refining? What made you keep generating alternatives?
- Use Essential Teaching Moment #1 to unpack why material choice affects design thinking
Explore Core Concepts:
- Use content from student guide's "Understanding Co-Design Through Rapid Prototyping" section
- Define key terms using their experience: low-fidelity prototyping, co-design, divergent thinking, convergent thinking
- Provide visual aids: Show professional examples of rough prototypes from IDEO, medical device development, or architectural mockups
- Distinguish between phases: exploration (many rough options) versus refinement (perfecting one direction)
Teaching Strategies to Consider:
- Think-pair-share: "Describe a time when you or someone you know couldn't explain what they wanted until they saw options"
- Compare/contrast with previous kits: Marcus knew he needed height adjustment; Sofia needs to discover which configuration works
- Case study: Show a product that succeeded through iterative prototyping versus one that failed by building elaborate first versions
- Use Essential Teaching Moment #4 to explore what makes co-design different from traditional "engineer designs, user receives" models
Connect to User Needs:
- Discuss: How does the quick-exchange system demonstrate user-centered thinking even though Sofia won't use it herself?
- Analyze design trade-offs: magnetic coupling is less secure than bolts but enables faster iteration—which matters more during exploration?
- Connect to professional practice: Why do design firms bill separately for "discovery" versus "implementation" phases?
Formative Assessment Ideas:
- Can students explain when low-fidelity prototyping is appropriate versus when higher fidelity is needed?
- Can they distinguish between divergent and convergent thinking and explain why both are necessary?
- Do they recognize co-design as a methodology, not just "getting user feedback"?
- Can they articulate why Sofia's problem requires exploration rather than specification?
Standards Connection: Primary: HCD #3 (Innovation Process—divergent and convergent), HCD #5 (Knowledge Development—balancing research and action), HCD #8 (Iteration Cycles), CAD 1.4 (Professional communication about design processes), NGSS Practice 6 (Constructing explanations), STEL 3H (Transfer knowledge to create opportunities)
4. ELABORATE
How can rapid prototyping methodology be applied to new contexts and challenges?
Extension & Application
Learning Focus: Students apply rapid prototyping methodology to new contexts, explore advanced co-design practices, or investigate how professionals use similar approaches.
Extension Menu
Choose based on available time, student readiness, and learning priorities
Option A: Multi-User Optimization Challenge
- What Students Do: Design a quick-exchange system for a different multi-configuration need—photography lighting, adjustable musical instrument mounts, or adaptable sports equipment positioning
- Skills Developed: Transferring prototyping methodology to new domains, recognizing when rapid iteration is valuable
- Possible Deliverables: 3-5 cardboard prototypes addressing different user scenarios, comparison matrix showing which configurations serve which needs
- Good For: Reinforcing that co-design and rapid prototyping are general methodologies, not specific to assistive technology
- Time Estimate: 45-60 minutes
Option B: From Cardboard to CAD—Documenting Discoveries
- What Students Do: Select their most promising cardboard prototype and create a refined CAD version, documenting what changed and why
- Skills Developed: Transitioning from low-fidelity to high-fidelity, recognizing when to move from exploration to refinement
- Possible Deliverables: CAD model with annotations explaining modifications from cardboard version, written reflection on when refinement became appropriate
- Good For: Connecting prototyping to formal CAD skills, understanding phase transitions in design
- Time Estimate: 60-90 minutes
Option C: Co-Design Interview Protocol
- What Students Do: Develop a structured interview and testing protocol for working with Sofia, including questions to ask before prototyping, during testing, and after evaluation
- Skills Developed: User research methodology, recognizing what information is discoverable through conversation versus experimentation
- Possible Deliverables: Interview guide with sample questions organized by project phase, testing observation checklist
- Good For: Developing HCD research skills, understanding the structure of collaborative design processes
- Time Estimate: 30-45 minutes
Option D: Iteration Speed Analysis
- What Students Do: Measure and compare iteration cycles—time required to modify and test a cardboard prototype versus a 3D printed version or screw-mounted system
- Skills Developed: Quantitative analysis of design processes, recognizing how tooling choices affect project timelines
- Possible Deliverables: Data table and graph showing iteration times, written analysis of when speed matters versus when precision matters
- Good For: Math integration and evidence-based reasoning about methodology choices
- Time Estimate: 30-40 minutes
Differentiation Through Choice
- Guided Support: Options C or D with templates and worked examples provided
- Open-Ended: Options A or B with minimal scaffolding for advanced students
- Student Interest: Allow choice based on whether students prefer hands-on building, research, or analysis
5. EVALUATE
How can students demonstrate understanding of rapid prototyping methodology and co-design principles?
Demonstrating Learning
Learning Focus: Students demonstrate understanding of rapid prototyping methodology and co-design principles through application or explanation.
Recommended Assessment: Prototyping Portfolio with Reflection
What Students Do: Create documentation of their prototyping process including initial sketches, photos of 2-3 distinct prototype approaches, and written reflection addressing key methodology concepts
What You Assess: Diversity of prototype approaches (divergent thinking), understanding of when low-fidelity is appropriate, ability to articulate co-design principles, recognition of iteration as discovery
Evidence: Multi-component portfolio containing:
- Initial brainstorming sketches (minimum 3 distinct approaches)
- Photos of built cardboard prototypes mounted on magnetic system
- Brief description of what each prototype tests or explores
- Written reflection (300-400 words) addressing: Why cardboard? How did quick-exchange enable experimentation? What makes this co-design rather than just prototyping? When would you transition from cardboard to refined versions?
Time Required: Can be built throughout lesson; 15-20 minutes for final reflection writing
Best For: Process-focused assessment that values exploration and metacognition about methodology
Alternative Assessment Options
Option 2: Design Methodology Comparison
- What Students Do: Compare rapid prototyping approach to traditional "design-then-build" approach through written analysis or presentation
- What You Assess: Understanding of when each approach is appropriate, recognition of trade-offs, ability to justify methodology choices
- Time Required: 20-30 minutes
- Best For: Students who excel at analytical thinking
Option 3: Co-Design Simulation
- What Students Do: Partner with another student to simulate engineer-user collaboration on a new challenge, alternating roles
- What You Assess: Application of divergent/convergent cycles, quality of questions asked during collaboration, ability to generate diverse options
- Time Required: 30-40 minutes
- Best For: Authentic demonstration of collaborative design skills
Reflection Prompts
Choose 2-3 based on your learning priorities
- Process: How did working with disposable materials change your willingness to try unusual ideas? What would you have done differently if each prototype took an hour to build?
- Concept: What's the difference between "rapid prototyping" and "sloppy work"? When is cardboard the right material choice and when isn't it?
- Impact: How does co-design change the relationship between engineer and user? What responsibilities does each partner have in the process?
- Transfer: What other problems—in school, at home, or in your community—might benefit from building many quick prototypes before refining one solution?
- Methodology: Explain the phrase "fail fast" to someone who thinks failure should be avoided. Why is speed of iteration sometimes more valuable than quality of individual attempts?
Standards Connection: Assessment should provide evidence of: CAD 1.2 (Design process understanding), CAD 1.3 (Documentation), HCD #3 (Innovation Process), HCD #8 (Iteration Cycles), HCD #9 (Design Documentation), NGSS Practice 2 (Modeling), STEL 2T (Modeling to aid decisions), STEL 7Z (Human-centered design principles)
APPENDIX: KEY VOCABULARY
Students should be able to define and use these terms:
Low-Fidelity Prototyping: Creating rough, simplified versions of designs using inexpensive, quick-to-modify materials to test core concepts without investing time or resources in refinement
Example: Using cardboard instead of 3D printed parts allows you to test five different mounting angles in the time it would take to print one
Co-Design: A collaborative process where users and designers work together to discover solutions, with users providing expertise about their experiences and needs while designers provide expertise in technical possibilities
Example: Working with Sofia to test different workspace configurations, where she evaluates what actually works in her real environment and you create the options for her to try
Divergent Thinking: The creative phase of problem-solving focused on generating many diverse possibilities without judging or evaluating them
Example: Brainstorming ten completely different ways to mount equipment for Sofia—side-mounted, overhead, sliding, rotating—before deciding which to build first
Convergent Thinking: The analytical phase of problem-solving focused on evaluating options against criteria and selecting the best approach
Example: Sofia testing each workspace configuration and identifying which heights and angles actually work for her tasks
Iteration Cycle: One complete loop of designing, building, testing, learning, and modifying—the speed of iteration affects how quickly solutions can be discovered
Example: With the magnetic quick-exchange system, you can test a new prototype in minutes; with screw-mounted systems, each change takes much longer
Quick-Exchange Interface: A connection mechanism designed to enable rapid swapping of components, prioritizing speed of change over maximum security
Example: The magnetic coupling allows instant attachment and removal of different cardboard prototypes so you can test many configurations quickly
Proof of Concept: A basic, functional prototype built to demonstrate that a core idea is feasible, not to showcase final quality or refinement
Example: A cardboard mount that successfully holds an object at the right height proves the concept works, even though it's not durable enough for permanent use
Design Infrastructure: Tools, systems, or processes created to support the design workflow itself, not just the final product
Example: The quick-exchange coupling isn't part of Sofia's final solution—it's infrastructure that enables the prototyping process
Solution Space: The range of all possible approaches to solving a problem, which must be explored to identify the optimal solution
Example: Sofia's workspace challenge has a large solution space—equipment could mount from any direction, at various heights, with different actuation methods—exploration reveals which region of that space contains the best answers
APPENDIX
Complete Standards Alignment
CAD Competencies
| Code | Competency | Where Addressed | How to Emphasize |
|---|---|---|---|
| CAD 1.1 | Technical vocabulary | Phase 2 (Building), Phase 3 (Explain)—terms like low-fidelity, divergent thinking, co-design, prototyping infrastructure | Create glossary of methodology terms; have students teach concepts to peers using kit as example |
| CAD 1.2 | Design process | Throughout—entire kit teaches prototyping as exploration phase of design; Phase 3 explicitly discusses process structure | Compare this kit's exploratory approach to previous kits' refinement focus; discuss when each phase is appropriate |
| CAD 1.3 | Documentation | Phase 2 (Building), Phase 5 (Portfolio assessment)—documenting multiple prototype variations and decision rationale | Require photo documentation of each prototype with brief explanation of what it tests; emphasize process over product |
| CAD 1.4 | Professional communication | Phase 3 (Explain), Phase 5 (Evaluate)—presenting methodology concepts and justifying approach choices | Have students explain why they chose cardboard and quick-exchange to someone unfamiliar with prototyping methodology |
CSTA Computer Science Standards
| Code | Standard | Where Addressed | How to Emphasize |
|---|---|---|---|
| Computing Systems: Devices | Describe computing device parts and functions | Phase 2 (Building)—magnetic coupling with servo system | Connect magnetic interface to broader concept of modular computing components |
| Computing Systems: Hardware & Software | Design projects combining hardware and software | Throughout—servo actuation integrated with physical prototypes | Discuss how same servo can actuate many different mounting configurations through interface design |
| Computing Systems: Troubleshooting | Determine solutions to hardware/software issues | Phase 2 (Building)—magnetic coupling strength, cardboard thread retention | Guide systematic testing of coupling security before declaring assembly complete |
HCD Skills & Tools
| Code | Skill/Tool | Where Addressed | How to Emphasize |
|---|---|---|---|
| HCD #1 | Problem Framing | Phase 1 (Engage)—understanding why Sofia's challenge requires discovery rather than specification | Contrast with previous clients who could specify needs; discuss recognizing unknown constraints |
| HCD #3 | Innovation Process | Throughout, especially Phase 3 (Explain)—explicit teaching of divergent vs. convergent thinking cycles | Require students to separate idea generation from idea evaluation; time divergent phase separately |
| HCD #5 | Knowledge Development | Phase 2 (prototyping), Phase 3 (reflection)—balancing exploration with progress toward solutions | Discuss when to stop generating options and start testing; how to avoid analysis paralysis |
| HCD #6 | Stakeholder Dialogue | Phase 1 (Client analysis), Extension Option C (Interview protocol)—preparing for collaborative testing with Sofia | Develop questions that can only be answered through physical testing, not verbal description |
| HCD #8 | Iteration Cycles | Phase 2 (Building multiple prototypes), Phase 3 (Explain iteration value)—rapid testing and modification | Count iterations possible in fixed time; compare to slower methods; celebrate productive failures |
| HCD #9 | Design Documentation | Phase 5 (Evaluate)—portfolio documenting process and multiple prototype approaches | Emphasize documenting what was learned, not just what was built; value dead-ends as discoveries |
| HCD Tool 1.1 | Interview | Extension Option C—developing interview protocol for co-design | Distinguish questions for before prototyping vs. during testing vs. after evaluation |
| HCD Tool 1.2 | Problem Statement | Phase 1 (Engage)—framing Sofia's challenge to include unknown optimal configuration | Practice statements that acknowledge what's known vs. what must be discovered |
| HCD Tool 3.1 | Sketching | Phase 2 (before building)—generating diverse configuration concepts | Require multiple sketches before building; emphasize quantity and diversity over quality |
| HCD Tool 4.3 | Proof of Concept | Phase 2 (Building)—creating functional but rough prototypes | Discuss difference between proof-of-concept (does this work?) and production-ready (is this polished?) |
| HCD Tool 5.2 | Results Analysis | Phase 3 (Explain), Phase 5 (Reflection)—analyzing what prototyping process revealed | Have students identify what they learned from prototypes that didn't work as well as successful ones |
NGSS Science & Engineering Practices
| Code | Practice | Where Addressed | How to Emphasize |
|---|---|---|---|
| Practice 1 | Define design problems | Phase 1 (Engage)—identifying that optimal configuration is unknown and must be discovered | Frame as research question: "Which workspace configurations enable Sofia's tasks without interference?" |
| Practice 2 | Developing and using models | Phase 2 (Building)—cardboard prototypes as physical models of possible solutions | Discuss models as tools for exploration and communication, not just final representations |
| Practice 3 | Planning investigations | Throughout—prototyping as systematic investigation of solution space | Treat each prototype as hypothesis to test; plan testing sequence thoughtfully |
| Practice 5 | Computational thinking | Extension Option D—analyzing iteration efficiency quantitatively | Calculate and compare iteration cycle times; graph relationships between method and speed |
| Practice 6 | Constructing explanations | Phase 3 (Explain), Phase 5 (Reflection)—explaining why methodology choices matter | Require evidence-based justification for why low-fidelity prototyping was appropriate here |
NGSS Core Ideas
| Code | Core Idea | Where Addressed | How to Emphasize |
|---|---|---|---|
| ETS1 | Engineering Design | Throughout—entire kit teaches exploration phase of engineering design process | Emphasize that real engineering involves discovering solutions, not just implementing known ones |
| ETS2 | Links Among Engineering, Technology, Science, and Society | Phase 1 (Client needs), Phase 3 (co-design methodology)—technology enabling independence | Discuss how prototyping methodology itself is a technology that improves design outcomes |
NGSS Cross-Cutting Concepts
- Cause and Effect: Phase 2, 3—How material choice (cardboard) causes different design behavior (willingness to explore)
- Systems and System Models: Phase 2, 3—Prototyping system as infrastructure enabling discovery process
- Structure and Function: Throughout—How quick-exchange structure enables rapid iteration function
STEL Standards
| Code | Standard | Where Addressed | How to Emphasize |
|---|---|---|---|
| STEL 1M | Creative problem-solving | Throughout, especially Phase 2 (divergent prototyping)—generating diverse solution approaches | Celebrate unusual ideas; require deliberately different prototypes, not minor variations |
| STEL 1Q | Research to inform design | Phase 1 (Engage), Extension Option C—understanding user needs to guide exploration | Distinguish research that happens before building from discoveries that emerge during testing |
| STEL 2M | Systems (inputs, processes, outputs) | Phase 2 (Building), Phase 3 (Explain)—prototyping workflow as system | Map inputs (materials, time, tools), process (assembly, testing), outputs (learning, refined designs) |
| STEL 2S | Quantify technical concepts | Extension Option D—measuring and comparing iteration speeds | Calculate time per iteration; create graphs showing relationship between method and efficiency |
| STEL 2T | Physical modeling to aid decisions | Phase 2 (Building)—cardboard prototypes as decision-making tools | Discuss how physical testing reveals information that drawings or descriptions cannot |
| STEL 3F | Apply to another setting | Extension Option A—transferring rapid prototyping to different challenge | Identify common characteristics of problems that benefit from this methodology |
| STEL 3H | Transfer knowledge | Extension Option A or E—recognizing when rapid prototyping is appropriate in new contexts | Create criteria for when low-fidelity exploration is valuable vs. when immediate refinement is better |
| STEL 4N | Analyze technology impacts on human interaction | Phase 3 (Explain)—how collaborative prototyping changes engineer-user relationship | Compare co-design to traditional "expert designs for user" model; discuss power dynamics |
| STEL 5G | Evaluate trade-offs | Throughout—material choice (cardboard vs. 3D printing), interface design (magnetic vs. bolted) | Make trade-off analysis explicit: what's gained and lost with each choice? |
| STEL 7Q | Apply design process | Throughout—entire kit teaches exploration phase of systematic design process | Position this kit within larger design process: empathy → exploration → refinement → implementation |
| STEL 7S | Human factors in design | Phase 1 (Client needs), Phase 3 (co-design)—designing processes that respect user expertise | Discuss how co-design acknowledges that users are experts in their own experiences; engineer expertise is complementary, not superior |
| STEL 7Z | Apply human-centered design principles | Throughout—entire kit embodies HCD through collaborative discovery with Sofia | Explicitly name HCD principles at work: empathy, iteration, user testing, co-creation |
Sample Assessment Rubric
Prototyping Portfolio with Reflection
| Criterion | Developing | Proficient | Advanced |
|---|---|---|---|
| Divergent Thinking | Creates 1-2 prototypes that are minor variations on a single concept | Creates 3+ prototypes representing meaningfully different approaches to the challenge | Creates 3+ distinct prototypes and articulates the different hypotheses each tests; shows evidence of pushing beyond obvious solutions |
| Technical Execution | Cardboard mounting functional but threads loose or coupling unreliable | Cardboard prototypes securely threaded with reliable magnetic coupling; all prototypes tested successfully | Prototypes show technical refinement appropriate to exploration phase; evidence of iterative improvement in construction technique |
| Methodology Understanding | Reflection mentions prototyping or testing but doesn't explain why low-fidelity materials matter | Reflection explains why cardboard enables exploration and how quick-exchange accelerates iteration | Reflection demonstrates deep understanding of when/why different fidelity levels are appropriate; connects to professional practice or transfer contexts |
| Co-Design Awareness | Describes building prototypes for Sofia to use | Explains that prototypes are for Sofia to test and evaluate; recognizes her expertise in determining what works | Articulates collaborative discovery process; distinguishes engineer's role (generating options) from user's role (convergent evaluation); explains why solution couldn't be specified upfront |
| Documentation Quality | Photos or sketches present but minimal explanation | Clear photos/sketches with brief descriptions of each prototype's purpose | Comprehensive documentation showing process evolution; annotations explain design decisions and what each iteration revealed |
Key Vocabulary
Students should be able to define and use these terms:
Low-Fidelity Prototyping: Creating rough, simplified versions of designs using inexpensive, quick-to-modify materials to test core concepts without investing time or resources in refinement
Example: Using cardboard instead of 3D printed parts allows you to test five different mounting angles in the time it would take to print one
Co-Design: A collaborative process where users and designers work together to discover solutions, with users providing expertise about their experiences and needs while designers provide expertise in technical possibilities
Example: Working with Sofia to test different workspace configurations, where she evaluates what actually works in her real environment and you create the options for her to try
Divergent Thinking: The creative phase of problem-solving focused on generating many diverse possibilities without judging or evaluating them
Example: Brainstorming ten completely different ways to mount equipment for Sofia—side-mounted, overhead, sliding, rotating—before deciding which to build first
Convergent Thinking: The analytical phase of problem-solving focused on evaluating options against criteria and selecting the best approach
Example: Sofia testing each workspace configuration and identifying which heights and angles actually work for her tasks
Iteration Cycle: One complete loop of designing, building, testing, learning, and modifying—the speed of iteration affects how quickly solutions can be discovered
Example: With the magnetic quick-exchange system, you can test a new prototype in minutes; with screw-mounted systems, each change takes much longer
Quick-Exchange Interface: A connection mechanism designed to enable rapid swapping of components, prioritizing speed of change over maximum security
Example: The magnetic coupling allows instant attachment and removal of different cardboard prototypes so you can test many configurations quickly
Proof of Concept: A basic, functional prototype built to demonstrate that a core idea is feasible, not to showcase final quality or refinement
Example: A cardboard mount that successfully holds an object at the right height proves the concept works, even though it's not durable enough for permanent use
Design Infrastructure: Tools, systems, or processes created to support the design workflow itself, not just the final product
Example: The quick-exchange coupling isn't part of Sofia's final solution—it's infrastructure that enables the prototyping process
Solution Space: The range of all possible approaches to solving a problem, which must be explored to identify the optimal solution
Example: Sofia's workspace challenge has a large solution space—equipment could mount from any direction, at various heights, with different actuation methods—exploration reveals which region of that space contains the best answers