ADAPTIVE GRIP: HELPING HAND KIT
LESSON SNAPSHOT
| Kit | Adaptive Grip: Helping Hand Kit - Student Guide #6 |
|---|---|
| Client | Aisha Williams, Age 19 - College art student needs flexible grabbing device to hold tools and materials while working on ceramics and sculpture projects |
| Core Concept | End effectors, compliant gripping mechanisms, and task-specific tool design |
| Prerequisites | Linear Motion: Game Assistance Kit (rack and pinion system); Understanding of servo positioning and control |
| Student Guide | Available at WagnerLabs.net/SmartServo |
⚠️ Safety Considerations
- Monitor servo strain: High-pitched squealing indicates excessive grip force and potential servo damage. Students should find optimal gripping distance and use padding when necessary.
- Test grip strength: Before gripping delicate objects, test with expendable items to calibrate appropriate force.
What This Kit Teaches
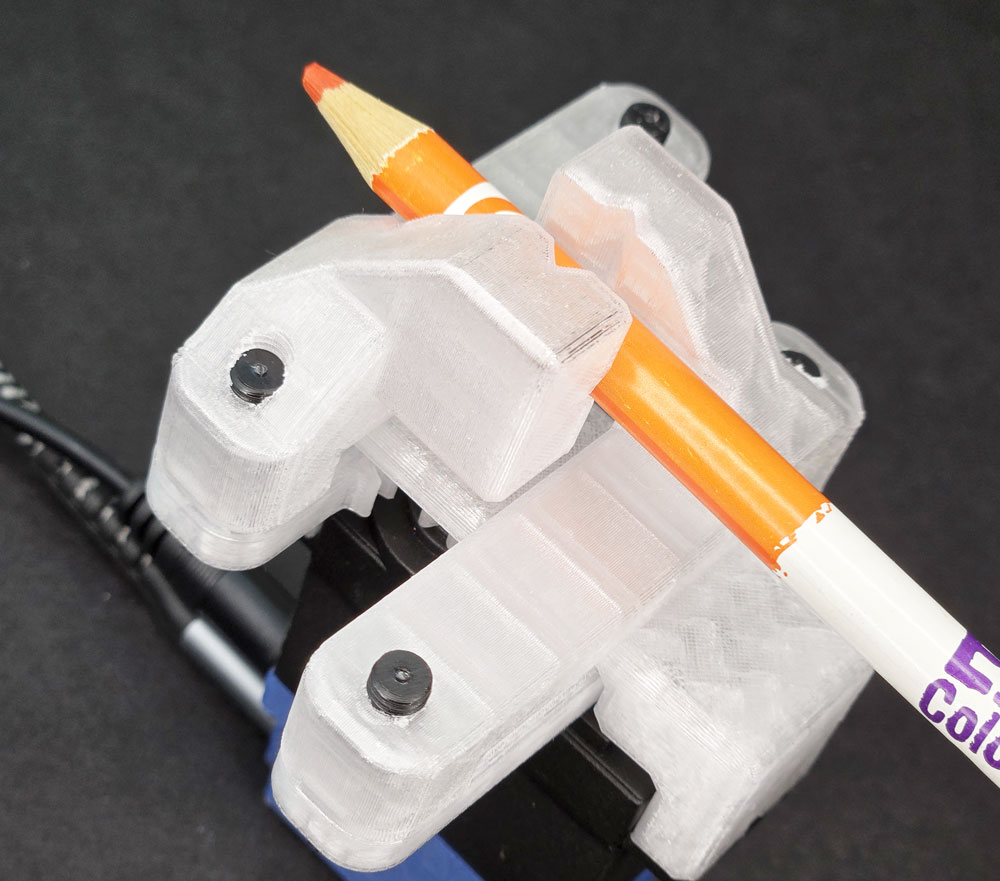
Engineering/Design Focus: This kit introduces end effector design and compliant gripping mechanisms while reinforcing principles of linear motion conversion and programmable positioning. Students explore how the same positioning system (Smart Servo with rack and pinion) becomes an entirely different tool when paired with a task-specific end effector. The grabber demonstrates adaptive design through compliant fingers that conform to irregular shapes without crushing delicate objects.
Human-Centered Design Connection: Aisha's need for an accessible holding device highlights how task-specific tooling addresses real constraints. Limited reach combined with the need for hands-free positioning requires a solution that extends capability without sacrificing the artist's control and precision.
Standards at a Glance: Primary domains are HCD, STEL, NGSS, CAD - See page 6 for complete alignment
ESSENTIAL TEACHING MOMENTS
Key concepts worth pausing to discuss during the lesson
Moment 1: End Effector as Interchangeable Tool
Student Guide Reference: Steps 4-5 (attaching vice components to existing rack system)
Core Idea: The same positioning mechanism (Smart Servo + racks) becomes a completely different tool when paired with a new end effector.
Why It Matters: Separating positioning systems from task-specific tools is fundamental to robotics and allows one system to perform multiple jobs through modular design.
Discussion Prompts to Consider:
- "You've used this exact same rack and pinion setup before to tip dice. What changed to make it grip objects instead?"
- "If you were designing for a different client, what other end effectors could attach to this same positioning system?"
- "Why might engineers design systems with interchangeable end effectors rather than building dedicated machines for each task?"
Watch For: Students may think the servo itself "knows" how to grip. Emphasize that the mechanical design of the vice creates gripping action; the servo just provides controlled linear motion.
Moment 2: Compliant Design for Adaptive Gripping
Student Guide Reference: Step 6 (testing vice range with different objects); "The Bigger Picture" section
Core Idea: The vice fingers flex to conform to irregular shapes, demonstrating compliant mechanisms that adapt through material flexibility rather than complex sensing.
Why It Matters: Compliant grippers solve the "universal gripper challenge" through mechanical intelligence rather than computational complexity.
Discussion Prompts to Consider:
- "Try gripping objects of different sizes and shapes. How does the grabber adapt to each one?"
- "What makes this design better for Aisha's art supplies than rigid metal fingers would be?"
- "Where is the 'intelligence' in this gripper—in the servo's control, or in the mechanical design itself?"
Extension Opportunity: Have students test the gripper with objects of dramatically different geometries (sphere, rectangle, irregular shape) and document how the compliant fingers adapt. Compare to rigid gripper designs.
Moment 3: Optimizing Through Servo Programming
Student Guide Reference: Step 7 (programming specific servo angles for desired grip positions)
Core Idea: Mechanical capability must be matched with precise control—finding optimal servo angles that provide secure grip without excessive force.
Why It Matters: Over-engineering (gripping too hard) wastes energy, damages materials, and strains mechanisms. Optimization requires iterative testing and refinement.
Discussion Prompts to Consider:
- "How will you know when the grip is 'just right' for Aisha's paintbrushes versus sculpting tools?"
- "What feedback does the system give you when you're gripping too hard? What damage might this cause over time?"
- "If Aisha needs to hold both delicate paper and heavy tools, how might you program different grip strengths?"
Demo/Visual Aid Suggestion: Demonstrate servo strain sound with an object that's too large, then show optimal grip. Display the code showing different angle values for different grip requirements.
Moment 4: Task-Specific Design for Real Users
Student Guide Reference: Client profile and reflection questions (Step 8)
Core Idea: Aisha doesn't need a universal gripper that holds everything—she needs a specialized tool that reliably holds art supplies without damage while positioned within her reach.
Why It Matters: The best assistive technology isn't the most sophisticated; it's the solution that reliably solves the specific problem in the user's actual environment.
Discussion Prompts to Consider:
- "What specific requirements did Aisha mention that shaped this design? What didn't she mention that you might need to ask about?"
- "How does holding a paintbrush steady differ from holding a reference photo? Would this same gripper work well for both?"
- "If Aisha works in different studio spaces with different wheelchair positions, how does this design accommodate that variability?"
MATERIALS & PREPARATION
WHAT STUDENTS NEED
Kit components:
- Vice sides (2 pieces), M5 Socket Screws
Previous kit components:
- Smart Servo, Rack & Pinion assembly, Loc-Line mounting system (optional)
Tools:
- M5 Tap and Handle, Phillips Screwdriver, 4mm Allen Key
Testing objects:
- Various items with different sizes, shapes, and fragility (paintbrushes, pencils, paper, small bottles, irregular shapes)
Safety equipment:
- Safety glasses if working with power tools
What You Need to Prepare
- Pre-build one kit to identify optimal servo angles and test grip range with sample objects
- Test grip force with delicate items to understand when squealing occurs and what padding helps
- Review student guide pages on "Understanding End Effectors" (THE BIGGER PICTURE section)
- Set up workstations with organized tapping supplies and vice components
- Gather test objects representing range of sizes, shapes, and fragility levels
- Prepare examples of other end effectors (images or physical examples of vacuum grippers, hooks, specialized tools)
- Choose assessment approach (see page 4)
- Select extension activities if time allows (see page 4)
Quick Troubleshooting Reference
| If students struggle with... | First, check... | Then try... |
|---|---|---|
| Vice sides don't move smoothly | Rack alignment and lubrication from previous kit | Ensure screws in vice aren't over-tightened, allowing sliding motion in slots |
| Servo makes squealing sound | Grip distance—object may be too large or grip too tight | Program smaller angular range; add padding to grip surfaces; test with smaller objects |
| Vice fingers don't grip securely | Servo angle range—may not be closing far enough | Increase closing angle incrementally while monitoring for strain; check that vice reaches minimum separation |
| Tapped holes strip or cross-thread | Tap alignment and technique | Review proper tapping: perpendicular entry, frequent backing out to clear chips, light pressure |
TEACHING PROGRESSION
The student guide provides detailed assembly and content. Use this framework to structure your instruction around their independent work.
1. ENGAGE
How might we understand Aisha's specific challenges with workspace accessibility and tool positioning?
Understanding the Challenge
Learning Focus: Students understand Aisha's workspace constraints and identify why accessible tool-holding is an engineering problem worth solving.
Suggested Activities
Client Introduction:
- Have students read Aisha's profile and identify her specific needs
- Consider: Empathy simulation activity—"Try holding a paintbrush in one hand while reaching across your workspace to position reference material with the other. Now imagine your reach is limited to a smaller radius."
- Discuss: What makes hands-free tool positioning challenging? What constraints exist in a wheelchair-accessible studio workspace?
Problem Framing:
- Guide students to articulate: "Aisha needs a way to hold art supplies and tools at specific angles and positions because her limited reach makes it difficult to keep materials positioned while working with both hands."
- Connect to broader accessibility and studio environment challenges
- Preview: How might a programmable gripper with flexible mounting solve this problem differently than fixed clamps or holders?
Connecting to Previous Learning:
- Recall the rack and pinion system from the dice roller kit
- Ask: "How did that mechanism convert rotation to linear motion? How might we use that same principle differently?"
Formative Assessment Ideas:
- Can students explain Aisha's challenge in terms of reach, positioning, and concurrent task demands?
- Do they identify both the holding function and the positioning flexibility as requirements?
- Do they recognize this as a modular design problem—same positioning system, different end effector?
Standards Connection: Primary: HCD #1 (Problem Framing from multiple perspectives), STEL 1Q (Research to inform design), NGSS ETS1 (Define design problems with criteria and constraints), STEL 7S (Human factors in design)
2. EXPLORE
How do modular end effector systems create task-specific functionality from general positioning mechanisms?
Building & Discovering
Learning Focus: Students develop assembly skills and make observations about how compliant gripping mechanisms adapt to different objects.
Facilitation Approach
Before Building:
- Students complete Steps 1-2 (identify components, gather previous kit parts)
- Consider: Prediction activity—"Looking at the vice design, what types of objects do you think it will grip well? What might be challenging?"
- Review safety for tapping operations and avoiding servo strain
During Building:
- Students follow assembly in Steps 3-6
- Use Essential Teaching Moments (page 2) as strategic pause points:
- After Step 5: Discuss end effector modularity (Moment #1)
- During Step 6: Explore compliant design through testing (Moment #2)
- During Step 7: Focus on optimization through programming (Moment #3)
- Circulate to observe tapping technique and vice alignment
- Encourage systematic testing with objects of increasing size and fragility
Testing Phase:
- Guide systematic observation with different objects
- Have students document: What types of objects grip securely? Where does squealing begin? How does padding affect grip?
- Consider: Data collection about minimum and maximum grippable diameters, optimal servo angles for different object types
- Preview optimization challenges for next phase
Formative Assessment Ideas:
- Are students tapping threads correctly (perpendicular, clearing chips, light pressure)?
- Can they explain how the vice attachment converts the rack's linear motion into gripping action?
- Are they making careful observations about when grip is too weak, optimal, or too strong?
- Do they adjust servo angles based on testing feedback rather than guessing?
Standards Connection: Primary: CAD 1.1 (Technical vocabulary: end effector, compliant mechanism, servo strain), CAD 1.2 (Assembly and fabrication techniques), NGSS Practice 3 (Planning systematic investigations), STEL 2M (Systems thinking: input-process-output-feedback), STEL 3B (Combining technologies into complex systems)
3. EXPLAIN
What engineering principles enable adaptive gripping and modular tool design?
Making Sense of Concepts
Learning Focus: Students connect their hands-on experience to engineering principles of end effector design, compliant mechanisms, and task-specific optimization.
Suggested Sequence
Process the Experience:
- Reflection: "What surprised you about how the gripper adapted to different shapes? What was harder to grip than you expected?"
- Introduce key vocabulary using completed assembly as reference: end effector, compliant mechanism, servo strain, optimal grip force
- Ground concepts in "THE BIGGER PICTURE" section of student guide
Explore Core Concepts:
End Effector Design:
- Use the student guide's explanation of end effectors as task-specific tools
- Demonstrate or show images of different end effectors: vacuum grippers, magnetic grippers, welding torches, surgical instruments
- Discuss: Why separate positioning systems from task-specific tools?
- Connect to Aisha's needs: How does this particular end effector match her requirements?
Compliant Mechanisms:
- Explore how the vice fingers flex to conform to irregular shapes
- Compare to rigid grippers: What advantages does compliance provide?
- Connect to previous kit (Smart Locking) which also used compliant design
- Discuss material properties: How does flexibility create "mechanical intelligence"?
Optimization and Trade-offs:
- Analyze servo strain: What causes it? Why is it a problem?
- Explore the optimization challenge: secure grip without excessive force
- Discuss how padding, grip distance, and servo angles all interact
- Connect to engineering design: finding "just right" rather than "maximum possible"
Teaching Strategies to Consider:
- Think-pair-share comparing rigid vs. compliant gripper designs
- Annotate assembly photos with labels for system components
- Compare this end effector to the dice-rolling tilt cup: same positioning system, completely different tools
- Identify examples of end effectors in everyday life (human hands, tool attachments, kitchen gadgets)
Connect to User Needs:
- Discuss: How do compliant fingers specifically help with Aisha's delicate art supplies?
- Analyze design trade-offs: universal gripper vs. task-specific tool
- Consider workspace context: How does programmable positioning complement the gripping function?
Formative Assessment Ideas:
- Can students define "end effector" and explain why modularity matters?
- Can they explain how compliant design creates adaptive gripping without sensors?
- Do they understand the optimization challenge and why "maximum grip" isn't always best?
- Can they connect technical features (flexible fingers, programmable angles) to user benefits (holds brushes without damage, positions where needed)?
Standards Connection: Primary: CAD 1.4 (Explain technical solutions clearly), HCD #2 (Communicate with stakeholders using appropriate technical language), NGSS Cross-Cutting Concepts (Structure and function, Systems and system models), STEL 7S (Human factors in design decisions), STEL 2S (Defend design decisions with reasoning)
4. ELABORATE
How can end effector concepts be applied to new contexts and optimized for specific tasks?
Extension & Application
Learning Focus: Students apply end effector concepts to new contexts, optimize designs for specific tasks, or explore advanced gripping challenges.
Choose based on available time, student readiness, and learning priorities
Option A: Task-Specific End Effector Design
What Students Do: Design a different end effector for the same rack and pinion system to solve a different accessibility challenge (examples: page turner, door handle adapter, utensil holder)
Skills Developed: Transfer of mechanical principles, CAD modeling, understanding modularity
Good For: Reinforcing end effector concepts and design thinking; 45-60 minutes
Standards: HCD #8 (Iteration), STEL 3F (Apply to another setting), CAD 3.1-3.2 (CAD fundamentals and parametric modeling), STEL 3H (Transfer knowledge)
Option B: Optimization Challenge
What Students Do: Create a testing protocol to find optimal servo angles for three different object categories (delicate/small, medium, large/sturdy), then document recommended settings
Skills Developed: Experimental design, quantitative reasoning, technical documentation
Good For: Deepening understanding of optimization and creating practical documentation; 30-40 minutes
Standards: NGSS Practice 3 (Planning and conducting investigations), NGSS Practice 4 (Analyzing data), CAD 1.3 (Technical documentation), HCD #9 (Documentation)
Option C: Universal Gripper Research
What Students Do: Research approaches to universal grippers (soft robotics, jamming grippers, multi-finger articulated hands) and compare to their compliant vice design
Skills Developed: Research skills, comparative analysis, understanding engineering trade-offs
Good For: Exploring cutting-edge robotics and understanding design trade-offs; 40-50 minutes
Standards: STEL 6C (Research historical and current solutions), HCD #5 (Knowledge development), STEL 4K (Examine technology effects), NGSS Practice 8 (Obtaining and evaluating information)
Option D: Multi-Position Programming
What Students Do: Program the gripper to cycle through multiple preset positions (example: hold paintbrush at angle 1, release, grip reference card at angle 2, release, repeat) using button controls
Skills Developed: Computational thinking, algorithm design, state machine logic
Good For: Advanced programming practice and understanding sequential control; 30-40 minutes
Standards: CSTA (Control structures, algorithms), NGSS Practice 5 (Computational thinking), STEL 2O (Open-loop system requiring human intervention)
Option E: Workspace Analysis
What Students Do: Interview an art teacher or research typical art studio setups to identify other tool-holding challenges, then propose how the gripper system could be adapted or what additional features would help
Skills Developed: Stakeholder research, contextual analysis, design iteration based on real feedback
Good For: Deepening HCD skills and connecting to real contexts; 40-60 minutes
Standards: HCD #1 (Problem framing with research), HCD #6 (Stakeholder dialogue), HCD Tool 1.1 (Interview techniques), STEL 1Q (Research to inform design)
Differentiation Through Choice
- Guided Support: Options B or D with templates, worked examples, and structured testing protocols
- Open-Ended: Options A, C, or E with minimal scaffolding for independent exploration
- Student Interest: Programming-focused students might choose Option D; design-focused students Option A; research-oriented students Option C or E
5. EVALUATE
How can students demonstrate understanding of end effector design, compliant mechanisms, and user-centered optimization?
Demonstrating Learning
Learning Focus: Students demonstrate competency in assembly, end effector concepts, compliant design understanding, and user-centered optimization.
Choose the method that best fits your goals and context
Option 1: Performance Demonstration with Technical Explanation
What Students Do: Successfully build and program the gripper, then demonstrate its operation while explaining end effector concepts and optimization decisions
What You Assess: Assembly accuracy, functional gripper, conceptual understanding of end effectors and compliant design, optimization reasoning
Evidence: Working device + verbal or written explanation of how it works and why design choices matter for Aisha
Time Required: Ongoing during build + 5-7 minutes per student for explanation
Best For: Authentic, hands-on demonstration of both technical skills and conceptual understanding
Option 2: Design Justification Document
What Students Do: Create a technical document explaining how the gripper system works, why compliant design was chosen, what optimization process they used, and how it addresses Aisha's specific needs
What You Assess: Technical vocabulary use, cause-and-effect reasoning, understanding of mechanical principles, user-centered thinking
Evidence: Multi-section document with labeled diagrams, explanation of concepts, and connection to client needs
Time Required: 30-40 minutes - can be built throughout lesson
Best For: Process-focused assessment emphasizing written technical communication
Option 3: Comparison and Transfer Presentation
What Students Do: Present the gripper design, compare it to alternative approaches (rigid grippers, universal grippers, or other end effectors), and propose how the same positioning system could be adapted for a different accessibility challenge
What You Assess: Understanding of design trade-offs, ability to compare solutions systematically, transfer of concepts to new contexts
Evidence: Presentation (live or recorded) with visuals comparing designs and proposing adaptations
Time Required: 20-30 minutes preparation + 5-7 minutes presentation
Best For: Demonstrating deep conceptual understanding and design thinking skills
Option 4: Optimization Portfolio
What Students Do: Document their testing process showing how they optimized servo angles for different objects, including data, observations, and final recommended settings with justification
What You Assess: Systematic testing approach, data collection and analysis, optimization reasoning, technical documentation quality
Evidence: Testing log with data table, annotated code showing final settings, written justification of choices
Time Required: 25-35 minutes - naturally emerges from testing phase
Best For: Emphasizing engineering optimization process and experimental design
Reflection Prompts
Choose 2-3 based on your learning priorities
- Process: What was the trickiest part of optimizing the gripper? How did you figure out the right balance between secure grip and not over-straining the servo?
- Concept: Explain "end effector" to someone who has never heard the term. Why is the concept important in robotics and assistive technology?
- Impact: How does this gripper specifically improve Aisha's ability to create art? What would be different if she only had fixed clamps or had to hold everything by hand?
- Transfer: Think about tasks in your own life where you need to hold something steady while doing something else with your hands. How could an adapted gripper system help?
- Design Thinking: If you were going to design version 2.0 of this gripper, what would you change? What additional information would you want from Aisha first?
Standards Connection: Assessment should provide evidence of: CAD 1.1-1.4 (Technical vocabulary, assembly skills, documentation, professional communication), HCD #2, #8, #9 (Stakeholder communication, iteration based on testing, design documentation), NGSS Practices (Systematic investigation, constructing explanations, obtaining and evaluating information), STEL 7Z (Human-centered design principles), STEL 2S (Defend design decisions), STEL 5G (Evaluate trade-offs)
Sample Assessment Rubric
Performance Demonstration - Technical Explanation
| Criterion | Developing | Proficient | Advanced |
|---|---|---|---|
| Assembly Accuracy | Vice assembled but has alignment issues or doesn't move smoothly through full range | Vice fully assembled with smooth operation through complete range of motion | Vice assembled with excellent precision; operates smoothly with optimal range calibrated for diverse objects |
| Technical Vocabulary | Uses everyday language; terms like "grabber" or "holder" rather than "end effector" | Uses key technical terms correctly: end effector, compliant mechanism, servo strain, optimization | Uses technical vocabulary precisely and naturally; defines terms clearly with accurate examples; explains relationships between concepts |
| Conceptual Explanation | Describes what the gripper does but not how or why it works | Explains how compliant fingers adapt to shapes and why modular end effector design matters | Explains complete system with cause-and-effect reasoning; connects to broader robotics principles; analyzes design trade-offs thoughtfully |
| User-Centered Thinking | Mentions that device helps Aisha hold art supplies | Explains how specific features (compliant fingers, programmable positions) address Aisha's stated needs | Analyzes design decisions in context of Aisha's complete workflow; proposes thoughtful optimizations based on her environment; asks insightful follow-up questions |
| Optimization Process | Tested gripper but without systematic approach or documentation | Systematically tested multiple objects; documented optimal angles; adjusted based on feedback | Conducted thorough testing protocol; documented results clearly; made evidence-based optimization decisions; identified limits of design |
APPENDIX
Complete Standards Alignment
CAD Competencies
| Code | Competency | Where Addressed | How to Emphasize |
|---|---|---|---|
| CAD 1.1 | Technical vocabulary | Phase 2 (Building), Phase 3 (Explain) - Introduce terms: end effector, compliant mechanism, servo strain, optimal grip force; use Teaching Moment #1, #2, #3 | Have students create labeled diagrams of their assembly identifying each component's function; develop glossary with examples from their testing |
| CAD 1.2 | Assembly/fabrication | Phase 2 (Building) - Steps 3-6: tapping threads, attaching vice components, aligning for proper range of motion | Observe and assess tapping technique; emphasize importance of perpendicular alignment; evaluate final assembly for smooth operation |
| CAD 1.3 | Technical documentation | Phase 5 (Evaluate) - Portfolio or documentation option; Extension Option B creates testing protocol documentation | Provide exemplars of clear technical documentation; emphasize that good documentation enables others to replicate results |
| CAD 1.4 | Explain technical solutions | Phase 3 (Explain), Phase 5 (Evaluate) - Explaining end effector concepts and how design serves user; presentations connecting technical features to Aisha's needs | Use sentence frames requiring technical vocabulary; push students to explain "how" and "why," not just "what"; assess ability to translate technical concepts for different audiences |
| CAD 2.4 | Geometric analysis | Phase 2 (Testing) - Understanding relationship between servo angle, rack position, vice jaw separation, and resulting grip force | Have students diagram the kinematic chain from servo rotation through rack travel to jaw closure; explore mathematical relationships |
| CAD 3.1 | CAD fundamentals | Extension Option A - Designing alternative end effectors for same positioning system | Guide CAD modeling of custom end effector attachments; emphasize how understanding the mounting interface enables modular design |
| CAD 3.3 | Assembly modeling | Phase 2, Extension Option A - Understanding how vice components integrate with existing rack system; designing new end effectors | Emphasize proper mating and constraints; discuss why modular attachment points (the mounting screws in slots) allow different tools |
CSTA Computer Science Standards
| Code | Standard | Where Addressed | How to Emphasize |
|---|---|---|---|
| Computing Systems: Devices | Describe computing device parts and functions | Phase 2, 3 - Understanding how servo, microcontroller, and button input create controlled gripping system | Explicitly identify and label each hardware component's role in the complete system |
| Computing Systems: Hardware & Software | Model hardware and software system interactions | Phase 2 (Step 7), Phase 3 - Programming servo angles to control physical gripping; understanding feedback loop from testing | Create system diagrams showing information flow from button press through code execution to servo movement to physical grip |
| Computing Systems: Troubleshooting | Determine solutions to hardware/software issues | Throughout - Debugging servo strain issues, optimizing angles, addressing alignment problems | Teach systematic debugging: Is it mechanical (alignment)? Electrical (connections)? Programming (angles)? Emphasize using feedback signals like servo sound |
| Algorithms & Programming: Control | Programming control structures | Phase 2 (Step 7), Extension Option D - Creating code for specific servo positions; potentially adding conditional logic for different grip modes | Guide students through structured approach to programming: define positions, test incrementally, refine based on results; Extension D adds state machine logic |
HCD Skills & Tools
| Code | Skill/Tool | Where Addressed | How to Emphasize |
|---|---|---|---|
| HCD #1 | Problem Framing | Phase 1 (Engage) - Analyzing Aisha's needs from multiple perspectives: artist's workflow, wheelchair accessibility, studio environment | Push beyond surface-level problem statement; consider: What tasks require both hands? When does limited reach create problems? How do art supplies vary in fragility? |
| HCD #2 | Stakeholder Communication | Phase 3 (Explain), Teaching Moment #4, Phase 5 (Evaluate) - Explaining how technical features serve Aisha's specific needs | Practice translating technical concepts into user-friendly language; focus on benefits ("holds brushes securely without damage") not just features ("compliant fingers") |
| HCD #5 | Knowledge Development | Phase 3 - Learning about end effectors, compliant mechanisms, and optimization; Extension Option C researches universal grippers | Make learning process visible; document questions that arose during testing and how students found answers |
| HCD #6 | Stakeholder Dialogue | Phase 1 (Engage), Step 8 reflection questions, Extension Option E - Understanding Aisha's needs and formulating follow-up questions | Model good interview techniques; emphasize open-ended questions that reveal context; Extension E provides real interview practice |
| HCD #8 | Iteration Cycles | Phase 2 (Testing - Step 6-7), Extension Option B - Testing with different objects and refining servo angles based on results | Emphasize that testing reveals opportunities for improvement; document what changed and why; celebrate learning from "failures" |
| HCD #9 | Design Documentation | Phase 5 (Evaluate) - Documentation portfolio option; Extension Option B creates technical user guide | Teach documentation serves two purposes: helping others replicate your work and helping you remember your own decisions |
| HCD Tool 1.1 | Interview | Extension Option E - Interviewing art teacher or researching studio needs | Provide interview protocol template; practice empathetic listening and asking follow-up questions |
| HCD Tool 1.2 | Problem Statement | Phase 1 (Engage) - Framing Aisha's challenge | Use template: "Aisha needs [function] because [constraint]"; emphasize specificity over generality |
| HCD Tool 2.1 | Criteria & Constraints | Phase 1, Phase 2 (Testing) - Identifying what makes a successful gripper (criteria: secure hold, no damage, accessible activation) and limitations (constraints: servo torque, reach, object size range) | Create explicit criteria and constraints list; test against criteria; discuss how constraints shape design decisions |
| HCD Tool 4.3 | Proof of Concept | Entire project - Building functional prototype for testing | Emphasize difference between proof of concept (does the principle work?) and finished product (optimized for all scenarios) |
| HCD Tool 5.2 | Results Analysis | Phase 2 (Testing), Extension Option B - Analyzing which objects grip well, when strain occurs, optimal angles for different cases | Teach systematic analysis: organize observations, identify patterns, make evidence-based conclusions |
NGSS Science & Engineering Practices
| Code | Practice | Where Addressed | How to Emphasize |
|---|---|---|---|
| Practice 1 | Asking questions and defining problems | Phase 1 (Engage) - Understanding Aisha's challenge and defining the engineering problem with specific criteria | Frame as engineering problem: What criteria define success? What constraints exist? Push students to ask clarifying questions |
| Practice 2 | Developing and using models | Phase 2, 3 - Physical assembly models end effector concept; diagrams model system interactions | Discuss how physical prototype helps understand end effector principles; create annotated diagrams showing force flow |
| Practice 3 | Planning and carrying out investigations | Phase 2 (Step 6-7), Extension Option B - Systematic testing with different objects to find optimal settings | Guide structured testing: vary one parameter at time; organize data collection; test multiple examples of each object type |
| Practice 5 | Using mathematics and computational thinking | Phase 2 (Step 7) - Programming servo angles; Extension Option D for advanced algorithms | Make computational thinking visible: algorithm for finding optimal angle involves iterative testing and conditional logic |
| Practice 6 | Constructing explanations | Phase 3 (Explain) - Explaining how compliant mechanisms work and why end effectors are modular | Require cause-and-effect reasoning: "The vice fingers flex BECAUSE the material has elasticity, which ALLOWS them to conform to irregular shapes" |
| Practice 8 | Obtaining, evaluating, and communicating information | Phase 3, Extension Option C - Researching end effector types and universal gripper approaches | Evaluate sources for credibility; synthesize information from multiple sources; present findings clearly |
NGSS Core Ideas
| Code | Core Idea | Where Addressed | How to Emphasize |
|---|---|---|---|
| ETS1 | Engineering Design | Throughout - especially Phase 1 (problem definition), Phase 2 (testing), Phase 4 (iteration), Phase 5 (evaluation) | Emphasize complete design cycle: define problem with criteria/constraints, develop solution, test systematically, optimize based on results |
| ETS2 | Links Among Engineering, Technology, Science, and Society | Phase 1 (Aisha's context), Teaching Moment #4, Phase 3 (connecting to accessibility) | Discuss how assistive technology addresses societal needs for independence and participation; consider broader impact on artists with disabilities |
NGSS Cross-Cutting Concepts:
- Cause and Effect: Phase 2, 3 - How servo angle causes rack movement which causes jaw closure; how excessive grip causes servo strain
- Systems and System Models: Phase 2, 3 - Understanding gripper as system with interconnected components; modeling how positioning system + end effector = complete tool
- Structure and Function: Phase 3, Teaching Moment #2 - How compliant finger structure enables adaptive gripping function; why flexibility serves task better than rigidity
- Stability and Change: Phase 2 (Testing) - Understanding optimal grip as balance point; too weak = instability, too strong = damage
STEL Standards
| Code | Standard | Where Addressed | How to Emphasize |
|---|---|---|---|
| STEL 1J | Develop innovative products that solve problems based on needs | Entire project - Designing gripper system specifically for Aisha's art studio needs | Connect every design decision back to Aisha's stated needs; emphasize how solution is tailored, not generic |
| STEL 1M | Apply creative problem-solving strategies | Phase 2 (optimization), Extension Options A, D - Finding novel approaches to grip optimization or alternative end effector designs | Value creative solutions to optimization challenge; celebrate unexpected approaches that work |
| STEL 1Q | Conduct research to inform design | Phase 1 (understanding Aisha's needs), Extension Options C, E - Researching art studio requirements or universal gripper approaches | Make research purposeful: what do we need to know to design effectively? How does research change our approach? |
| STEL 2M | Differentiate inputs, processes, outputs, and feedback | Phase 2, 3 - System analysis: input (button), process (code + servo rotation + rack movement), output (grip), feedback (servo sound indicating strain) | Create explicit system diagram labeling each component type; discuss feedback loops |
| STEL 2S | Defend design decisions | Phase 3, 5 - Justifying choice of compliant design, explaining optimization process, defending grip force decisions | Require evidence-based justification: "We chose this angle BECAUSE testing showed it gripped securely WITHOUT causing strain" |
| STEL 2T | Demonstrate conceptual, graphical, and physical modeling | Phase 1 (sketching), Extension Option A (CAD), Phase 2 (physical prototype) | Use all three modeling types progressively: sketch initial ideas, CAD for precision if doing extensions, physical for testing |
| STEL 2W | Select resources balancing availability, cost, desirability, and waste | Phase 2 - Using existing rack system rather than building new positioning mechanism | Discuss design efficiency: modular approach reuses existing components, reducing cost and complexity |
| STEL 2X | Cite examples of criteria and constraints | Phase 1, 2 - Criteria: secure hold, no damage, easy activation; Constraints: servo torque limits, object size range, mounting compatibility | Make criteria and constraints explicit; refer to them during testing and optimization |
| STEL 3B | Demonstrate how simple technologies combine to form complex systems | Phase 2, 3 - Rack system + vice attachment + servo + microcontroller + code = adaptive gripper system | Discuss how each component is relatively simple, but integration creates sophisticated capability |
| STEL 3D | Employ technology to solve problems that could not be solved otherwise | Phase 1, Teaching Moment #4 - How programmable gripper with flexible positioning solves accessibility challenges fixed clamps cannot | Emphasize what makes technological solution uniquely valuable: programmability, precision, adaptability |
| STEL 3F | Apply a product/system from one setting to another | Teaching Moment #1, Extension Option A - Same positioning system serves completely different functions with different end effectors | Explicitly identify what stays the same (positioning) and what changes (end effector); discuss transfer potential |
| STEL 3H | Transfer knowledge from one technology to another | Extension Option A - Applying end effector concepts to design new tools | Guide students to identify underlying principles that transfer across applications |
| STEL 4K | Examine positive and negative technology effects | Phase 1, 3 - Discussing how gripper enables Aisha's independence while considering limitations or potential over-reliance on technology | Balance enthusiasm for assistive technology with thoughtful consideration of limitations and user agency |
| STEL 5G | Evaluate trade-offs and impacts | Phase 2 (optimization), Phase 3, Teaching Moment #3 - Analyzing trade-offs between grip strength, servo wear, delicate object protection | Make trade-offs explicit: strength vs. gentleness, universal vs. specialized, simple vs. sophisticated |
| STEL 7Q | Apply design process to solve problems through prototyping | Entire project follows design process from problem definition through prototyping, testing, and refinement | Map project activities to design process steps; emphasize iteration based on testing |
| STEL 7S | Create solutions applying human factors | Entire project, especially Phase 1 and Teaching Moment #4 - Designing specifically for Aisha's reach limitations, hand-free operation needs, and delicate art supply requirements | Center human factors in every design conversation; return to user needs when evaluating options |
| STEL 7Z | Apply human-centered design principles | Entire project explicitly uses HCD process: empathy (understanding Aisha), define (problem framing), ideate (considering approaches), prototype (building), test (optimization) | Make HCD process visible; label phases explicitly; emphasize how user feedback drives decisions |
| STEL 8J | Use devices to control technological systems | Phase 2 (Step 7), Extension Option D - Programming servo control via button input; potentially creating multi-state control systems | Discuss control concepts: open-loop vs. closed-loop, discrete positions vs. continuous control, single-action vs. state machine |
Sample Assessment Rubric
Performance Demonstration - Technical Explanation
| Criterion | Developing | Proficient | Advanced |
|---|---|---|---|
| Assembly Accuracy | Vice assembled but has alignment issues or doesn't move smoothly through full range | Vice fully assembled with smooth operation through complete range of motion | Vice assembled with excellent precision; operates smoothly with optimal range calibrated for diverse objects |
| Technical Vocabulary | Uses everyday language; terms like "grabber" or "holder" rather than "end effector" | Uses key technical terms correctly: end effector, compliant mechanism, servo strain, optimization | Uses technical vocabulary precisely and naturally; defines terms clearly with accurate examples; explains relationships between concepts |
| Conceptual Explanation | Describes what the gripper does but not how or why it works | Explains how compliant fingers adapt to shapes and why modular end effector design matters | Explains complete system with cause-and-effect reasoning; connects to broader robotics principles; analyzes design trade-offs thoughtfully |
| User-Centered Thinking | Mentions that device helps Aisha hold art supplies | Explains how specific features (compliant fingers, programmable positions) address Aisha's stated needs | Analyzes design decisions in context of Aisha's complete workflow; proposes thoughtful optimizations based on her environment; asks insightful follow-up questions |
| Optimization Process | Tested gripper but without systematic approach or documentation | Systematically tested multiple objects; documented optimal angles; adjusted based on feedback | Conducted thorough testing protocol; documented results clearly; made evidence-based optimization decisions; identified limits of design |
Alternate Focus Areas (choose 3-4 based on your priorities):
- Problem-Solving & Troubleshooting: How effectively does student diagnose and resolve assembly or programming issues?
- Systems Thinking: Does student understand how components interact to create complete functionality?
- Documentation Quality: Is testing process and optimization reasoning clearly documented with appropriate detail?
- Communication Clarity: Can student explain technical concepts to different audiences (peer, client, instructor)?
- Design Reasoning: Does student justify decisions with evidence and connect choices to user needs?
- Technical Precision: Is assembly executed with care for alignment, smooth operation, and calibration?
Key Vocabulary
Students should be able to define and use these terms:
End Effector: The specialized tool at the end of a robotic positioning system that performs the actual task—the "business end" of the robot.
Example: The vice attachment is an end effector that grips objects; the servo and rack system provide positioning, but the vice does the actual holding work.
Compliant Mechanism: A mechanism that achieves motion or force through the flexibility of the material itself rather than through traditional rigid joints.
Example: The vice fingers flex to conform to irregular shapes like paintbrushes or sculpting tools, adapting without needing sensors or complex controls.
Servo Strain: The condition when a servo motor is working against excessive resistance, often producing a high-pitched squealing sound that indicates potential damage.
Example: When the gripper tries to close on an object that's too large, the servo makes a squealing sound warning that it's being forced beyond safe operating limits.
Optimization: The process of finding the best solution within given constraints—not necessarily the maximum or minimum, but the ideal balance.
Example: Finding the servo angle that grips Aisha's paintbrush securely without crushing the bristles or straining the servo.
Modular Design: Creating systems where components can be easily swapped or replaced, allowing one positioning system to perform multiple different tasks.
Example: The same rack and pinion system that tips dice in the previous kit now grips objects because we attached a different end effector while keeping the positioning mechanism unchanged.
Task-Specific Tool: A specialized instrument designed for a particular job rather than a universal tool trying to do everything.
Example: This gripper is designed specifically for Aisha's delicate art supplies; it wouldn't be ideal for heavy construction tools, and that's okay—it solves her specific problem excellently.
Linear Motion: Movement in a straight line, as opposed to rotational movement.
Example: The rack and pinion system converts the servo's rotation into linear motion that closes the vice jaws.
Mechanical Intelligence: When a mechanism's physical design creates adaptive behavior without requiring sensors or complex computational control.
Example: The compliant vice fingers automatically adjust to different object shapes through their flexibility, not because the computer tells them how to adapt.
Adaptive Gripping: The ability of a gripper to securely hold objects of different sizes, shapes, and fragility levels.
Example: The same gripper holds a thin paintbrush, a cylindrical glue bottle, and an irregular piece of reference material because the compliant fingers conform to each shape.
User-Centered Optimization: Making design decisions based on specific user needs and context rather than maximizing technical specifications.
Example: We don't program maximum grip force; we find the force that's strong enough for Aisha's needs while protecting delicate art supplies and extending servo life.
Notes & Customization
What Worked in My Class:
[Space for teacher notes]
Adaptations I Made:
[Space for teacher notes]
Student Insights or Innovations:
[Space for teacher notes]
Timing Notes:
[Space for teacher notes - e.g., "Step 7 optimization took longer than expected; allow extra time" or "Students finished assembly quickly; moved directly to extensions"]
Object Testing Recommendations:
[Space for teacher notes - e.g., "Tennis ball worked well for testing grip range" or "Avoid testing with anything truly fragile until students have optimized"]
For Next Time:
[Space for teacher notes]
Smart Servo Lesson Structure v5.0 | Designed to support teacher autonomy while providing comprehensive guidance