RECIPE TURNER KIT
LESSON SNAPSHOT
| Kit | Recipe Turner - Student Guide #4 |
|---|---|
| Client | Margaret "Maggie" Chen, Age 72 - Needs an automated recipe card flipper with accessible controls for use while cooking |
| Core Concept | Designing accessible input methods that work under real-world constraints (wet hands, limited mobility) |
| Prerequisites | Getting Started guide (servo basics, code.py editing); Flexible Mounting kit helpful but not required |
| Student Guide | Recipe Turner Kit guide pages 1-7 |
⚠️ Safety Considerations
- Standard electrical safety: ensure power connections are secure and away from water sources
- Kitchen testing: When testing in kitchen-like conditions, keep electronics elevated and dry
What This Kit Teaches
Engineering/Design Focus: This kit introduces students to input device design and situational accessibility. Students learn that good interface design considers not just permanent disabilities, but temporary and situational constraints everyone experiences. The project demonstrates how designing for extreme cases creates solutions that benefit all users—a core principle of universal design.
Human-Centered Design Connection: Maggie's challenge reveals how everyday tasks become barriers when fine motor control is compromised. The large, multi-position button addresses her needs while cooking, when hands are wet, shaky, or holding utensils. This project teaches that accessibility isn't about special accommodations—it's about recognizing diverse ways people interact with technology.
Standards at a Glance: Primary domains are HCD, STEL, CSTA, NGSS - See page 5 for complete alignment
ESSENTIAL TEACHING MOMENTS
Key concepts worth pausing to discuss during the lesson
Moment 1: Multiple Pathways to One Action
Student Guide Reference: Client profile and "Designing Input Methods for the Environment" section
Core Idea: Effective accessibility design creates multiple ways to accomplish the same task rather than requiring one precise method.
Why It Matters: This principle—called "degrees of freedom in interaction"—appears throughout human-centered design. Whether designing for disabilities, situational constraints, or user preference, providing multiple input methods increases both accessibility and usability.
Discussion Prompts to Consider:
- "Maggie needs to activate this device with her hip, elbow, or foot. How does designing for those options make the device work better even when she uses her hand?"
- "Can you think of other devices that give you multiple ways to do the same thing? Why might designers have included those options?"
- "What would happen if we designed this button to only work when pressed with a fingertip?"
Watch For: Students may initially see accessibility features as "special modifications" rather than good design that helps everyone. Challenge this by discussing situational constraints.
Moment 2: Situational vs. Permanent Constraints
Student Guide Reference: "Beyond Accessibility: Understanding Situational Constraints" in The Bigger Picture
Core Idea: Many people face temporary barriers (holding a baby, wearing gloves, having flour-covered hands) that mirror permanent disabilities, so designing for accessibility creates universal benefits.
Why It Matters: Understanding situational constraints helps students see disability not as an individual problem but as a mismatch between person and environment—a mismatch good design can address.
Discussion Prompts to Consider:
- "Besides cooking with messy hands, when else might someone need hands-free controls or large buttons?"
- "How does designing for Maggie's permanent needs also solve problems for people without disabilities?"
- "Think about times you've struggled with a device because of the situation you were in. What made it difficult?"
Extension Opportunity: Have students document situations in their own lives where they faced temporary constraints that mimicked disabilities (typing with a bandaged finger, carrying groceries while unlocking a door, using a phone in bright sunlight).
Moment 3: Engineering Reliable Activation
Student Guide Reference: Steps 1-5 (assembly and testing) and "The Engineering of Reliable Activation" section
Core Idea: Good switches must balance opposing requirements—easy enough to activate with limited strength, but resistant enough to prevent accidental triggering—while providing clear feedback.
Why It Matters: This tension between competing requirements is fundamental to engineering. Students learn that professional design involves precise calibration, extensive testing, and understanding trade-offs.
Discussion Prompts to Consider:
- "Why does the Jelly Bean button provide both a click sound and tactile feedback? What happens if you can't see the device?"
- "What would happen if the button required very little pressure to activate? What problems might that create?"
- "Professional designers test switches for millions of presses. Why does reliability matter so much for assistive technology?"
Demo/Visual Aid Suggestion: Bring in several types of switches (light switches, keyboard keys, game controller buttons, doorbell) and have students compare activation force, travel distance, and feedback. Discuss which would work well for Maggie and why.
MATERIALS & PREPARATION
MATERIALS NEEDED
What Students Need:
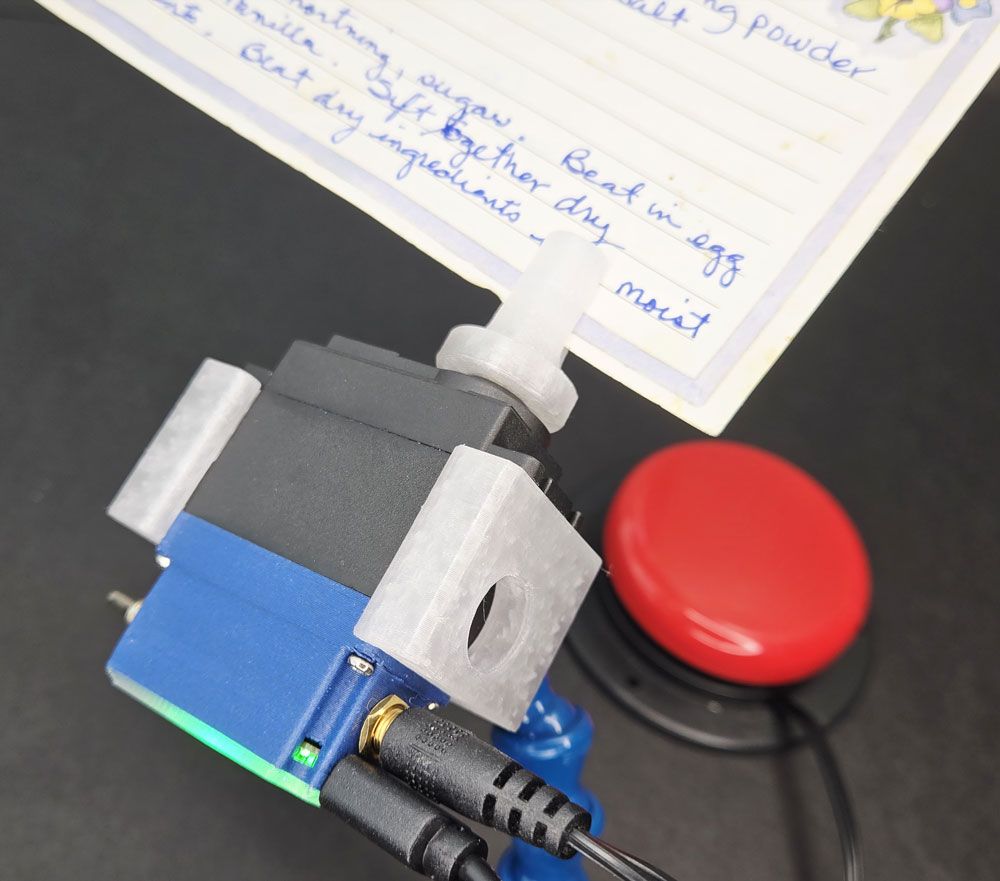
- Recipe Turner Kit components: Page Holder, M3 Spline Screw
- Smart Servo from Getting Started kit
- Phillips screwdriver (size #1)
- AbleNet Jelly Bean button (included in kit)
- Test button (optional - can be replaced by Jelly Bean)
- Power cable (USB to micro-USB)
- Power source (battery pack, laptop USB port, or wall adapter)
- Sample cards for testing: index cards (3x5" or 4x6"), cardstock, or printed recipe cards
Safety equipment:
- None specific beyond standard electrical precautions
What You Need to Prepare
- Pre-build one kit to identify assembly challenges and determine optimal card thickness
- Prepare sample recipe cards with content on both sides for realistic testing
- Review student guide pages 4-7 on input device design and situational constraints
- Test code modifications for different rotation behaviors (single flip vs. continuous rotation)
- Set up demonstration area where students can test button activation with different body parts
- Prepare examples of other devices with accessible controls (emergency stops, foot pedals, touchless sensors)
- Choose assessment approach (see page 4)
- Select extension activities if time allows (see page 4)
Quick Troubleshooting Reference
| If students struggle with... | First, check... | Then try... |
|---|---|---|
| Page Holder not securing to spline | Alignment of spline shape and screw threading | Remove and realign carefully; ensure screw isn't cross-threaded |
| Card too tight or falling out | Card thickness (paper weight) | Test with different thicknesses; slight flexing of holder is acceptable |
| Rotation angle inappropriate | Current code parameters | Review snippets to adjust servo angle; may need 90-180° depending on card size |
| Button not responding | Connection to 3.5mm jack; toggle switch position | Verify secure connection and that servo is in "armed" mode (green light) |
1. ENGAGE
How might we understand Maggie's specific challenges with using recipe cards while cooking?
Understanding the Challenge
Learning Focus: Students understand Maggie's needs and recognize that designing for accessibility benefits everyone.
Suggested Activities
Client Introduction:
- Have students read Maggie's profile carefully, noting both her conditions (arthritis, Parkinson's) and her context (cooking, wet hands, family recipes)
- Consider: Empathy simulation activity—have students try to flip index cards while wearing thick winter gloves or with one hand behind their back, or while holding a small object
- Discuss: What specific motions are difficult for Maggie? When during cooking would she need to flip a recipe card?
Problem Framing:
- Guide students to articulate: "Maggie needs a way to view both sides of recipe cards because her arthritis and Parkinson's make picking up cards difficult, and her hands are often wet or messy while cooking"
- Expand the conversation: "Who else might benefit from hands-free recipe viewing?" (surgeons viewing procedures, factory workers checking instructions, bakers with flour-covered hands)
- Preview: How might engineering create solutions that work in these challenging conditions?
Formative Assessment Ideas:
- Can students explain why Maggie needs multiple activation options (hip, elbow, foot)?
- Do they recognize situational constraints as distinct from permanent disabilities?
- Do they see this as a universal design challenge, not just "special" accommodation?
Standards Connection: Primary: HCD #1 (Problem Framing), STEL 1Q (Research to inform design), STEL 7S (Human factors in design), NGSS ETS2 (Technology's role in solving problems)
2. EXPLORE
How do different input devices work, and what makes them effective in specific situations?
Building & Discovering
Learning Focus: Students develop assembly skills and make observations about input device design through building and testing.
Facilitation Approach
Before Building:
- Students review components (Step 1) and identify the Phillips screwdriver
- Consider: Prediction activity—"How do you think the Page Holder will grip the card? How tight will it need to be?"
- Safety check: Electrical connections should be secure and away from any water sources during kitchen-context testing
During Building:
- Students follow assembly Steps 2-4 in their guide
- Pause at Step 3 (Essential Teaching Moment #3): Discuss alignment and secure attachment—this connection must reliably hold through repeated rotations
- Pause at Step 4: Have students test with different card thicknesses; the holder flexes slightly by design (compliant mechanism)
- Encourage troubleshooting: What happens if the screw isn't fully tightened? What if the card is too thick?
Testing Phase (Step 5):
- Students connect power and test button, then observe initial behavior
- Use Essential Teaching Moment #4: Facilitate reflection on design decisions—Should it flip once per press? Should it return automatically? Why?
- Have students test the Jelly Bean button's activation from different positions (pressing with hand, elbow against table edge, foot if device is floor-mounted)
- Consider: Document observations—What activation force does the button require? What feedback does it provide?
Formative Assessment Ideas:
- Are students assembling the Page Holder securely?
- Can they explain why card thickness matters?
- Do they test the Jelly Bean button systematically (different positions, different forces)?
- Are they making observations about input device characteristics (size, force, feedback)?
Standards Connection: Primary: CAD 1.2 (Assembly/fabrication), CSTA: Devices (Hardware components and functions), NGSS Practice 3 (Planning investigations), HCD Tool 4.3 (Proof of concept)
3. EXPLAIN
What principles make input devices accessible, and how does designing for accessibility benefit everyone?
Making Sense of Concepts
Learning Focus: Students connect their hands-on experience to principles of accessible input design and universal design.
Suggested Sequence
Process the Experience:
- Reflection: "What surprised you about using the Jelly Bean button compared to the test button? Where did you need to problem-solve?"
- Introduce key vocabulary: situational constraints, degrees of freedom, activation force, tactile feedback, universal design
- Ground concepts in the completed assembly: point to the large button surface, discuss the audible click
Explore Core Concepts:
- Use content from "The Bigger Picture" section (pages 5-7 of student guide)
- Multiple Pathways (Essential Teaching Moment #1): Discuss how the button works from multiple body positions and why that matters
- Situational Constraints (Essential Teaching Moment #2): Connect Maggie's permanent needs to everyone's temporary constraints
- Engineering Activation Mechanisms (Essential Teaching Moment #3): Analyze the Jelly Bean button's features—2.5" diameter, 2.5 oz activation force, click feedback
- Extend to real-world examples: emergency stop buttons (large, red, mushroom-shaped for fist/elbow activation), foot pedals (free hands for other tasks), touchscreens (work with gloves)
Teaching Strategies to Consider:
- Compare-contrast activity: Create a chart comparing the Jelly Bean button to everyday switches (light switch, keyboard key, doorbell)—compare size, force, feedback, and applications
- Demonstration: Show examples of accessible controls from various domains (medical equipment, industrial machinery, public interfaces)
- Design analysis: "If you were designing a button for underwater use, or for use while wearing thick gloves, what features would you prioritize?"
Connect to User Needs:
- Discuss: How does the large button size specifically help Maggie when her hands are wet or shaky?
- Analyze design trade-offs: A more sensitive button would be easier to press but might trigger accidentally; where's the balance?
- Consider optimization: Should Maggie's device be counter-mounted or floor-pedal activated? What factors should guide that decision?
Formative Assessment Ideas:
- Can students define "situational constraints" with examples?
- Can they explain why activation force and feedback matter?
- Do they connect the button's features (size, force, feedback) to Maggie's specific needs?
- Can they identify universal design principles in everyday objects?
Standards Connection: Primary: HCD #2 (Stakeholder communication), STEL 4K (Positive effects of technology), STEL 7Z (Human-centered design principles), NGSS Cross-Cutting Concept 6 (Structure and function), CAD 1.4 (Professional communication)
4. ELABORATE
How can we apply accessible input design principles to new contexts and optimize solutions for specific users?
Extension & Application
Learning Focus: Students apply input design concepts to new contexts, optimize for specific users, or explore related challenges.
Extension Menu
Choose based on available time, student readiness, and learning priorities
Option A: Kitchen Context Design Challenge
- What Students Do: Design a complete kitchen setup for Maggie—determine mounting location, power source, and code behavior based on her cooking routine
- Skills Developed: Contextual reasoning, systems thinking, user-centered design decisions
- Possible Deliverables: Annotated sketch of kitchen setup with justifications, written proposal with photos
- Time Estimate: 30-45 minutes
- Good For: Reinforcing HCD principles and authentic design thinking
- Standards: HCD #8 (Iteration cycles), STEL 3F (Apply to another setting), STEL 2X (Criteria and constraints)
Option B: Accessible Input Comparison Study
- What Students Do: Research and analyze three different accessible input methods (voice control, touch-free sensors, foot pedals, sip-and-puff switches) and recommend which would work best for different users or contexts
- Skills Developed: Research skills, comparative analysis, matching solutions to contexts
- Possible Deliverables: Comparison matrix or presentation with recommendations
- Time Estimate: 45-60 minutes
- Good For: Deepening understanding of input device diversity and contextual appropriateness
- Standards: HCD #5 (Knowledge development), STEL 1Q (Research to inform design), HCD Tool 3.3 (Benchmarking)
Option C: Code Customization for User Preferences
- What Students Do: Modify code to create different rotation behaviors—single flip with return button, continuous rotation, timed automatic return—then evaluate which works best for Maggie's needs
- Skills Developed: Computational thinking, user preference analysis, iterative testing
- Possible Deliverables: Modified code.py file with comments explaining changes; video demonstration; written evaluation
- Time Estimate: 30-45 minutes
- Good For: CSTA standards and programming practice with authentic purpose
- Standards: CSTA: Algorithms & Programming (Control structures), NGSS Practice 5 (Computational thinking), HCD #8 (Iteration cycles)
Option D: Universal Design Case Study
- What Students Do: Identify three everyday objects designed for accessibility that also benefit everyone (automatic doors, curb cuts, closed captions, voice assistants) and explain the design features and their universal benefits
- Skills Developed: Design analysis, recognizing universal design principles, clear communication
- Possible Deliverables: Photo essay, infographic, or short presentation
- Time Estimate: 30-40 minutes
- Good For: Connecting lesson concepts to broader design principles; strong for writing integration
- Standards: STEL 4K (Technology effects), STEL 4N (Technology and human interaction), HCD #1 (Problem framing with broader context)
Option E: Design for Different Situational Constraints
- What Students Do: Choose a different situational constraint (surgeon in sterile environment, mechanic with greasy hands, person carrying groceries) and design an input method that addresses that specific challenge
- Skills Developed: Transfer of learning, creative problem-solving, contextual design
- Possible Deliverables: Sketch with annotations, prototype using available materials, design proposal
- Time Estimate: 45-60 minutes
- Good For: Demonstrating understanding through transfer; maker/fabrication integration
- Standards: STEL 3H (Transfer knowledge), STEL 1M (Creative problem-solving), HCD Tool 3.1 (Sketching)
Differentiation Through Choice
- Guided Support: Options A, C, or D with templates, guiding questions, and examples
- Open-Ended Exploration: Options B or E with minimal scaffolding for advanced students
- Student Interest: Allow choice based on whether students prefer hands-on making (A, E), research/analysis (B, D), or programming (C)
5. EVALUATE
How can students demonstrate their understanding of accessible input design and user-centered decision making?
Demonstrating Learning
Learning Focus: Students demonstrate understanding of accessible input design principles and can communicate design decisions.
Recommended Assessment: Design Justification Presentation
- What Students Do: Present their recipe turner as a solution for Maggie, explaining specific design decisions (button choice, mounting approach, code behavior) and connecting technical features to user needs
- What You Assess: Understanding of accessible design principles, ability to justify decisions with user-centered reasoning, use of technical vocabulary
- Evidence: Oral presentation (3-5 minutes) with demonstration of working device; can be recorded or live
- Time Required: 5-10 minutes preparation using reflection from Step 5; 3-5 minutes per presentation
- Best For: Authentic demonstration of HCD thinking and technical communication skills
Suggested Structure for Presentation:
- Introduce Maggie and her specific challenges (30 seconds)
- Demonstrate device functionality (30 seconds)
- Explain 2-3 key design decisions and why they address Maggie's needs (90 seconds)
- Describe one trade-off or compromise made during design (30 seconds)
- Propose one improvement for future iteration (30 seconds)
Alternative Assessment Options
Option 2: Comparative Design Analysis
- What Students Do: Compare the recipe turner to two other assistive technology solutions, analyzing how each addresses user needs through input design
- Evidence: Written analysis (1-2 pages) or annotated comparison chart
- Time Required: 30-40 minutes
- Best For: Students who excel at written analysis and comparative thinking
Option 3: Universal Design Portfolio Entry
- What Students Do: Document the recipe turner project as a case study in universal design, including photos, technical specifications, user needs analysis, and reflection on how accessibility benefits all users
- Evidence: Multi-page portfolio entry combining visual documentation and written explanation
- Time Required: Built throughout lesson; 20-30 minutes for final assembly
- Best For: Process-focused assessment with emphasis on documentation and reflection
Reflection Prompts
Choose 2-3 based on your learning priorities
- Process: What was the most challenging design decision you had to make for Maggie? How did you resolve it?
- Concept: Explain the difference between situational and permanent constraints using examples from your own experience.
- Impact: How does the recipe turner improve Maggie's independence? What does "independence" mean in the context of assistive technology?
- Transfer: Where else in Maggie's life might she benefit from large, accessible buttons? What about other people—who else could use this type of input method?
- Design Thinking: If you could ask Maggie three follow-up questions about her cooking routine, what would you ask and why?
- Universal Design: Choose one object you use daily. How could it be redesigned to be more accessible, and how might that benefit everyone?
Standards Connection: Assessment should provide evidence of: HCD #1, #2, #6 (Problem framing, communication, stakeholder dialogue), STEL 7S, 7Z (Human factors and HCD principles), CAD 1.1, 1.4 (Technical vocabulary and professional communication), NGSS ETS2 (Technology's impact on society)
Sample Assessment Rubric
| Criterion | Developing | Proficient | Advanced |
|---|---|---|---|
| Problem Understanding | Describes Maggie's challenge in general terms | Clearly explains Maggie's specific needs including physical limitations and situational constraints | Analyzes Maggie's needs comprehensively, connecting permanent and situational constraints and identifying broader applications |
| Technical Explanation | Describes what the device does but not how features address needs | Explains how specific features (button size, activation force, Page Holder design) solve Maggie's challenges | Explains technical features with precise vocabulary, connects structure to function, and analyzes engineering trade-offs |
| User-Centered Reasoning | Mentions that device helps Maggie | Justifies design decisions by connecting features to user needs with clear reasoning | Provides detailed rationale for decisions, considers context of use, and proposes evidence-based optimizations |
| Universal Design Thinking | Focuses only on Maggie's disability | Recognizes that features benefiting Maggie also help others in similar situations | Articulates universal design principles, provides diverse examples of situational constraints, and explains broader societal benefits |
CONNECTIONS & CONTEXT
Learning Sequence
What Students Already Know (from previous kits):
- How to connect the Smart Servo to power sources (Getting Started)
- Basic servo control and code.py editing (Getting Started, Snippets 6-7)
- How to attach servo horns to the spline (Getting Started)
- Optional: Flexible mounting concepts if Flexible Mounting kit completed (LocLine systems, degrees of freedom)
What's New in This Kit:
- The concept of accessible input devices and activation requirements
- Distinguishing between permanent and situational constraints
- Professional assistive technology switches (AbleNet Jelly Bean button)
- Contextual design—how environment and routine influence technical decisions
- Universal design principles that benefit all users
Where This Leads (in future kits):
- More complex input/output relationships (Dual Servo kit: Interactive Show)
- Multi-axis control requiring coordinated input (Pan & Tilt kit)
- System integration where multiple components must work together
- User testing and iteration with feedback from actual use cases
Cross-Curricular Connections
Mathematics
Measuring and comparing activation force (2.5 oz), converting between units (ounces to grams), analyzing button dimensions (2.5" diameter), calculating angles of rotation (optimizing servo movement to flip cards completely)
Science
Physics concepts: force required for activation, feedback mechanisms (auditory and tactile), simple machines in Page Holder (compliant mechanism), energy transfer from button press through electrical signal to servo rotation
Social Studies
Americans with Disabilities Act (ADA) and accessibility legislation history; assistive technology evolution; investigating aging populations and technology needs; cultural attitudes toward disability and accessibility
English/Language Arts
Technical writing: creating user instructions for Maggie; persuasive writing: design proposal justifying decisions; research: investigating accessible design case studies; vocabulary development: technical terms related to input devices and activation
Additional Resources
For Teachers:
- Student Guide: Recipe Turner Kit guide pages 1-7
- Code Snippets for customization: tinyurl.com/SmartServoSnips (especially Snippets 6-9)
- 3D Printing Files: tinyurl.com/SS-STL-RECIPE
- AbleNet Product Information: Product specifications for Jelly Bean switch (included in kit materials)
- Universal Design Resources: Center for Universal Design (NC State University) principles and case studies
For Students:
- Assembly: Detailed instructions in student guide Steps 1-5
- Concepts: "The Bigger Picture" section on pages 5-7 of guide (situational constraints, activation engineering, context-driven design)
- Code Modification: Reference Getting Started guide Snippets 6-7 for servo angle control
- Reflection Questions: Step 5 prompts about mounting and code customization
Extension Reading/Resources:
- Articles about universal design and its benefits for everyone
- Case studies of accessible technology (screen readers, voice control, closed captions)
- Information about arthritis and Parkinson's disease (age-appropriate medical resources)
- Videos showing assistive technology in real-world use (cooking, working, learning)
- Resources on situational disabilities and inclusive design (Microsoft Inclusive Design toolkit)
APPENDIX
Complete Standards Alignment
CAD Competencies
| Code | Competency | Where Addressed | How to Emphasize |
|---|---|---|---|
| CAD 1.1 | Technical vocabulary | Phase 2 (Building), Phase 3 (Explain) - Terms like activation force, tactile feedback, situational constraints, universal design, degrees of freedom; Teaching Moments #1-3 | Have students create glossaries defining terms with examples from the kit; use terms consistently when discussing design decisions |
| CAD 1.2 | Assembly/fabrication | Phase 2 (Building) - Steps 1-4 assembling Page Holder to servo spline; testing card insertion | Observe assembly technique; emphasize importance of secure spline attachment for reliable operation; discuss how fabrication tolerances affect card grip |
| CAD 1.3 | Technical documentation | Phase 5 (Evaluate) - Portfolio option documenting project; Extension Option A documenting kitchen setup | Provide documentation templates; emphasize clarity and completeness; discuss what information future users would need |
| CAD 1.4 | Explain technical solutions | Phase 3 (Explain), Phase 5 (Evaluate) - Design justification presentation connecting features to user needs | Use sentence frames requiring technical vocabulary; practice explaining to different audiences (engineer vs. end user); require causal reasoning ("This feature works because...") |
CSTA Computer Science Standards
| Code | Standard | Where Addressed & How to Emphasize |
|---|---|---|
| Computing Systems: Devices | Describe computing device parts and functions | Phase 2 (Testing) - Understanding how button connects to servo through 3.5mm jack; microcontroller interprets signal and controls servo. Explicitly identify system components; create flow diagrams showing signal path. |
| Computing Systems: Hardware & Software | Model hardware and software system interactions | Phase 2 (Testing), Extension Option C - Understanding how code interprets button signal and controls servo angle. Demonstrate cause-and-effect: button press → electrical signal → code reads input → code sends servo command → servo rotates. |
| Computing Systems: Troubleshooting | Determine solutions to hardware/software issues | Phase 2 (Building) - Troubleshooting table; debugging connection or rotation issues. Teach systematic troubleshooting: Check connections first, then power, then code. |
| Algorithms & Programming: Control | Programming control structures | Extension Option C - Modifying code to create different rotation behaviors using conditionals and loops. Review Snippets 6-9; guide students through changing servo angles and adding delay. |
HCD Skills & Tools
| Code | Skill/Tool | Where Addressed & How to Emphasize |
|---|---|---|
| HCD #1 | Problem Framing | Phase 1 (Engage) - Analyzing Maggie's challenges from multiple perspectives (permanent disability, situational constraints, environmental factors); Teaching Moment #2. Use empathy simulation; have students articulate problem from Maggie's perspective. |
| HCD #2 | Stakeholder Communication | Phase 3 (Explain), Phase 5 (Evaluate) - Presentations explaining technical features in user-friendly language. Practice translating technical concepts for non-technical audiences; focus on benefits rather than features. |
| HCD #5 | Knowledge Development | Throughout - Learning about accessible input devices, activation requirements, universal design principles. Make learning visible: What do we need to know to solve this problem? |
| HCD #6 | Stakeholder Dialogue | Phase 1 (Engage) - Discussing follow-up questions for Maggie (Step 5 reflection); considering her environment and routine. Model good interview questions: open-ended, focused on context, avoiding assumptions. |
| HCD #8 | Iteration Cycles | Extension Option A or C - Testing different mounting locations or code behaviors; Phase 2 (Testing) observing and adjusting. Emphasize that testing reveals opportunities, not failures. |
| HCD #9 | Design Documentation | Phase 5 (Evaluate) - Portfolio option; Extension Option A documenting setup. Teach that documentation serves future users and your future self. |
| HCD Tool 1.1 | Interview | Phase 1 (Engage) - Formulating follow-up questions for Maggie based on reflection prompts. Practice creating questions that reveal user routines and context. |
| HCD Tool 1.2 | Problem Statement | Phase 1 (Engage) - Framing challenge using structure "Maggie needs [what] because [why]". Use template to create precise problem statements. |
| HCD Tool 2.1 | Criteria & Constraints | Throughout - Identifying requirements like low activation force, multiple body positions, moisture resistance. Distinguish "must-haves" from "nice-to-haves". |
| HCD Tool 3.1 | Sketching | Extension Option A or E - Visualizing mounting solutions or new input methods. Emphasize quick, rough sketches for ideation. |
| HCD Tool 4.3 | Proof of Concept | Phase 2 (Building & Testing) - Creating functional prototype to test with cards. Focus on function over aesthetics initially. |
| HCD Tool 5.2 | Results Analysis | Phase 2 (Testing), Step 5 reflection - Observing button activation from different positions; gathering feedback about rotation behavior. Create observation protocols; document what works and why. |
NGSS Science & Engineering Practices
| Code | Practice | Where Addressed & How to Emphasize |
|---|---|---|
| Practice 1 | Asking questions and defining problems | Phase 1 (Engage) - Understanding Maggie's needs and framing design problem with criteria and constraints. Frame as engineering problem: What are the requirements? What are the limitations? |
| Practice 2 | Developing and using models | Phase 2 (Building) - Physical prototype represents solution; Extension Options include sketching and CAD modeling. Discuss how prototypes help test ideas before full implementation. |
| Practice 3 | Planning and carrying out investigations | Phase 2 (Testing) - Systematic testing of button activation from different positions; testing with different card types. Guide structured observation: What are we testing? What will we measure? |
| Practice 5 | Using mathematics and computational thinking | Extension Option C - Modifying code to control rotation angles; analyzing activation force (2.5 oz). Make computational thinking visible: How does code translate button press into servo movement? |
| Practice 6 | Constructing explanations | Phase 3 (Explain) - Explaining how button features (size, force, feedback) address Maggie's needs. Require causal reasoning: "This works because..." |
| Practice 8 | Obtaining, evaluating, and communicating information | Extension Option B or D - Researching accessible input methods or universal design cases; Phase 5 presentations. Evaluate source credibility; present technical information to varied audiences. |
NGSS Core Ideas:
| Code | Core Idea | Where Addressed & How to Emphasize |
|---|---|---|
| ETS1 | Engineering Design | Throughout - especially Phase 1, 4, 5 defining problem, iterating solutions, evaluating effectiveness. Emphasize design as iterative process; criteria and constraints drive decisions. |
| ETS2 | Links Among Engineering, Technology, Science, and Society | Phase 1 (Client context), Teaching Moment #2, Phase 3 (Universal design) - How input design addresses human needs and benefits society. Discuss how assistive technology improves quality of life. |
NGSS Cross-Cutting Concepts:
- Cause and Effect: Phase 2, 3 - Button press causes electrical signal causes servo rotation; activation force causes tactile feedback
- Systems and System Models: Phase 2, 3 - Understanding device as integrated system (button → microcontroller → servo); modeling input-process-output flow
- Structure and Function: Phase 3, Teaching Moment #3 - How button's physical structure (large surface, spring mechanism, click) enables its function (reliable activation with low force)
STEL Standards
| Code | Standard | Where Addressed & How to Emphasize |
|---|---|---|
| STEL 1J | Develop innovative products and systems that solve problems based on individual or collective needs and wants | Throughout - Designing recipe turner specifically for Maggie's needs and recognizing broader applications. Center design on user needs; discuss how same solution addresses multiple users' needs. |
| STEL 1M | Apply creative problem-solving strategies to improve existing devices or develop new approaches to solving problems | Extension Options B, E - Exploring alternative input methods or applying concepts to different constraints. Encourage brainstorming multiple solutions; value diverse approaches. |
| STEL 1Q | Conduct research to inform intentional inventions and innovations that address specific needs and wants | Phase 1 (Engage) - Understanding Maggie's condition and needs; Extension Option B researching input methods. Make research purposeful: What do we need to know to design well? |
| STEL 2M | Differentiate between inputs, processes, outputs, and feedback in technological systems | Phase 2 (Testing), Phase 3 (Explain) - Button as input, code as process, servo rotation as output, visual/tactile feedback from button. Explicitly label system components; create diagrams showing flow. |
| STEL 2O | Create an open-loop system requiring human intervention | Phase 2 (Building & Testing) - Device requires human to press button to initiate action; no automatic operation. Discuss difference between open-loop (human-initiated) and closed-loop (automatic). |
| STEL 2S | Defend decisions related to design problems | Phase 5 (Evaluate) - Justifying design decisions in presentation; Extension Option A explaining setup choices. Require reasoning: "We chose X because..." |
| STEL 2X | Cite examples of criteria and constraints affecting final design | Throughout - Activation force requirements, button size needs, mounting location limits, power source availability. Make criteria and constraints explicit. |
| STEL 3F | Apply a product, system, or process from one setting to another | Teaching Moment #2, Extension Option E - Recognizing how recipe turner concept applies to surgery, factory work, etc. Ask: "Where else would this solution work?" |
| STEL 3H | Transfer knowledge from one technology to another in order to solve problems or create opportunities | Extension Options - Applying input design principles to new challenges. Identify underlying principles that transfer. |
| STEL 4K | Examine positive and negative effects of technology on the environment, society, and human experience | Phase 1, 3 - How assistive technology improves independence and quality of life; Teaching Moment #2 on universal benefits. Discuss technology's broader impacts. |
| STEL 4N | Analyze how technologies change human interaction and communication across social, cultural, political, and economic domains | Phase 3 (Universal design discussion) - How accessible technology enables participation and independence. Explore how assistive technology changes what people can do. |
| STEL 5G | Evaluate trade-offs and impacts of various technologies as part of a rational decision-making process | Extension Options A, C - Choosing between mounting locations, code behaviors, or input methods based on trade-offs. Make trade-offs visible: What do you gain? What do you give up? |
| STEL 7Q | Apply a technology and engineering design process to solve problems by designing, creating, and testing prototypes, models, products, or systems | Throughout entire lesson - Following complete design process from understanding needs through building and testing. Emphasize design as process, not just product. |
| STEL 7S | Create solutions by applying human factors in design solutions | Throughout - especially Teaching Moments #1, 4 - Designing for Maggie's physical capabilities, environmental context, and routines. Center human capabilities and limitations in all design decisions. |
| STEL 7Z | Apply principles of human-centered design | Throughout entire lesson - Empathy, problem definition, ideation, prototyping, testing all align with HCD process. Make HCD steps explicit; return to user needs throughout process. |
Sample Assessment Rubric
Design Justification Presentation - Accessible Input Design
| Criterion | Developing | Proficient | Advanced |
|---|---|---|---|
| Problem Understanding | Describes Maggie's challenge in general terms | Clearly explains Maggie's specific needs including physical limitations and situational constraints | Analyzes Maggie's needs comprehensively, connecting permanent and situational constraints and identifying broader applications |
| Technical Explanation | Describes what the device does but not how features address needs | Explains how specific features (button size, activation force, Page Holder design) solve Maggie's challenges | Explains technical features with precise vocabulary, connects structure to function, and analyzes engineering trade-offs |
| User-Centered Reasoning | Mentions that device helps Maggie | Justifies design decisions by connecting features to user needs with clear reasoning | Provides detailed rationale for decisions, considers context of use, and proposes evidence-based optimizations |
| Universal Design Thinking | Focuses only on Maggie's disability | Recognizes that features benefiting Maggie also help others in similar situations | Articulates universal design principles, provides diverse examples of situational constraints, and explains broader societal benefits |
Key Vocabulary
Students should be able to define and use these terms:
Activation Force: The amount of pressure required to trigger a switch or button. The Jelly Bean button requires only 2.5 ounces of force.
Example: Low activation force allows Maggie to press the button even when her hands are weak from arthritis.
Tactile Feedback: Physical sensation you feel when interacting with a device, like the click of a button.
Example: The Jelly Bean button provides tactile feedback through a spring mechanism that you can feel compress and release.
Situational Constraints: Temporary limitations created by context or environment that make tasks difficult, similar to permanent disabilities.
Example: Having wet hands while cooking is a situational constraint that makes picking up cards difficult, just like Maggie's arthritis.
Degrees of Freedom: The number of independent ways something can move or be used; in interaction design, this means multiple pathways to accomplish the same task.
Example: The large button provides degrees of freedom by working whether pressed with hand, hip, elbow, or foot.
Universal Design: Design approach that creates products usable by the widest range of people without special adaptation.
Example: The recipe turner is universal design because features helping Maggie (large button, simple activation) also help anyone with wet or busy hands.
Accessible Input Device: A control interface designed to be usable by people with various physical capabilities.
Example: The Jelly Bean button is an accessible input device with its large surface area and low activation force.
Assistive Technology: Equipment or devices that help people with disabilities perform tasks that might otherwise be difficult or impossible.
Example: The recipe turner is assistive technology that helps Maggie view recipes without picking up cards.
Human-Centered Design (HCD): Design process that prioritizes understanding users' needs, contexts, and experiences throughout development.
Example: We used HCD by starting with Maggie's specific needs rather than deciding what technology to use first.
Trade-off: A compromise where improving one aspect of a design makes another aspect less optimal.
Example: A more sensitive button would be easier to press but might trigger accidentally—engineers must balance these trade-offs.
Compliant Mechanism: A device that achieves motion through flexibility of material rather than separate moving joints.
Example: The Page Holder uses compliant design—it flexes slightly to grip cards of different thicknesses.
Notes & Customization
What Worked in My Class:
[Space for teacher notes]
Adaptations I Made:
[Space for teacher notes]
Student Insights or Innovations:
[Space for teacher notes]
Timing Notes:
[Space for teacher notes - e.g., "Assembly took 15 minutes; students needed 30 minutes for Extension Option C"]
For Next Time:
[Space for teacher notes]
Context-Specific Modifications:
[Space for notes about adapting for your school's schedule, resources, student population, or learning goals]
Smart Servo Lesson Structure v5.0 | Designed to support teacher autonomy while providing comprehensive guidance