GEAR SYSTEMS: STEADY DISPLAY KIT
LESSON SNAPSHOT
| Kit | Gear Systems: Steady Display Kit - Student Guide #3 |
|---|---|
| Client | Dr. Elena Rodriguez, Age 67 - Needs a slow, stable rotating platform to view her sculpture collection without painful twisting motions |
| Core Concept | Mechanical advantage through gear ratios and compound gear systems |
| Prerequisites | Getting Started with Smart Servo (Guide 1), Flexible Mounting Kit (Guide 2) |
| Student Guide | tinyurl.com/SS-STL-GEARS |
⚠️ Safety Considerations
- Press-fitting bearings: Requires significant force - students should use flat surfaces (table and book) rather than pliers to ensure straight insertion
- M5 set screws: Should be snug but not over-tightened to avoid stripping threads or cracking 3D printed parts
What This Kit Teaches
Engineering/Design Focus: This kit introduces mechanical advantage and gear ratio calculations while reinforcing principles of motion transmission and system design. Students discover the fundamental engineering trade-off between speed and torque by designing and building a compound gear train that transforms the servo's fast rotation into slow, powerful, stable motion suitable for displaying delicate objects.
Human-Centered Design Connection: The technical challenge of slowing rotation while increasing stability directly addresses Dr. Rodriguez's need to view her art collection without pain. Students learn how precise engineering calculations translate into meaningful improvements in daily living for people with arthritis.
Standards at a Glance: Primary domains are STEL (2M, 2S, 3B), NGSS (ETS1, Practice 5, Structure and Function), CAD (1.1, 1.2, 1.4), HCD (#1, #2, #8) - See page 6 for complete alignment
ESSENTIAL TEACHING MOMENTS
These are the key concepts worth pausing to discuss during the lesson. They align with steps in the student guide.
Moment 1: The Speed-Power Trade-off
Student Guide Reference: Steps 10-11 (installing compound and platform gears) and Step 13 (initial testing)
Core Idea: Connecting a small gear to a larger gear trades rotational speed for increased torque and smoother control.
Why It Matters: This fundamental principle of mechanical advantage appears in bicycles, car transmissions, wind turbines, and countless mechanical systems. Understanding this trade-off helps students recognize that engineering solutions involve deliberate compromises.
Discussion Prompts to Consider:
- "When you first test the system in Step 13, what do you notice about how the platform moves compared to the servo horn alone?"
- "Why might Dr. Rodriguez prefer slower rotation even though it takes longer to complete one turn?"
- "Where have you experienced this speed-power trade-off in your own life? Think about bikes, door handles, or bottle caps."
Watch For: Students may assume bigger gears are "better" without recognizing the trade-off. Help them articulate what is gained (torque, stability) and what is lost (speed).
Moment 2: Calculating Gear Ratios
Student Guide Reference: Educational Content section on "The Math Behind Gear Ratios"
Core Idea: The ratio of teeth between connected gears determines precisely how much speed decreases and torque increases - it's a mathematical relationship, not guesswork.
Why It Matters: Gear ratio calculations allow engineers to design systems with predictable performance. This mathematical modeling is essential for matching motor capabilities to real-world tasks.
Discussion Prompts to Consider:
- "If the drive gear has 25 teeth and connects to a 40-tooth gear, what's the gear ratio? What does that number tell us?"
- "How would changing to a 60-tooth platform gear affect the rotation speed? The torque?"
- "Why is it valuable that we can calculate these outcomes before building?"
Extension Opportunity: Have students calculate the total gear reduction in their compound system by multiplying the individual ratios. Compare predicted rotation speed to observed performance.
Moment 3: Compound Gears Multiply Effect
Student Guide Reference: Steps 10-11 (observing how compound gear connects two gear pairs) and Educational Content on "Compound Gears"
Core Idea: When multiple gear pairs work together, their effects multiply rather than add, creating dramatic speed reductions from modest individual ratios.
Why It Matters: Compound systems allow engineers to achieve extreme gear reductions (100:1 or more) without requiring impossibly large gears. This principle enables precision robotics, clock mechanisms, and industrial machinery.
Discussion Prompts to Consider:
- "Why do we need two gear pairs instead of just making one really big gear?"
- "If each gear pair provides 4:1 reduction, what's the total reduction? Why do we multiply instead of add?"
- "What are the practical limits of this approach? Could we just keep adding gear stages forever?"
Demo/Visual Aid Suggestion: Show a mechanical clock or wind-up toy with visible compound gears. Demonstrate how slow output motion results from fast input motion through multiple stages.
Moment 4: Design for Real Human Needs
Student Guide Reference: Client profile and "THE BIGGER PICTURE" section
Core Idea: Technical features like slow, stable rotation directly address Dr. Rodriguez's specific challenge - viewing art without painful twisting motions caused by rheumatoid arthritis.
Why It Matters: This connection illustrates how engineering serves human needs. The gear system isn't just clever mechanics; it's a tool that preserves someone's connection to their passion and maintains independence.
Discussion Prompts to Consider:
- "How does the slow rotation specifically help Dr. Rodriguez compared to manually turning objects?"
- "What other technical features would make this more useful for her? Think about starting/stopping, speed control, or platform size."
- "How might this same gear reduction principle help other people with different challenges?"
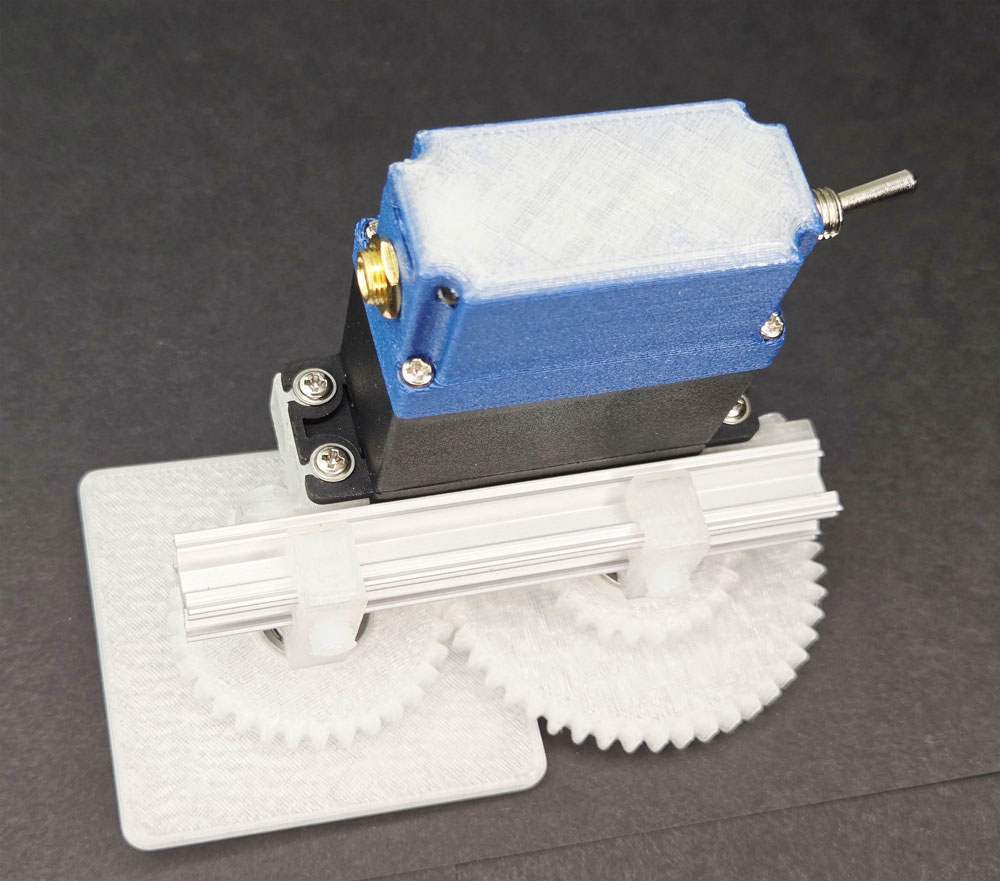
MATERIALS & PREPARATION
WHAT STUDENTS NEED
Kit components listed in student guide Step 1:
- M5 set screws
- 605ZZ bearings
- 3" T-slot framing
- Platform gear, compound gear, drive gear
- Servo T-slot mounts
- Bearing axles
- Mounting screws
Tools from previous kits (student guide Step 2):
- 3mm slotted screwdriver
- Smart Servo
- Programming cable
- Test button
- Phillips screwdriver
- M5 tap and tap handle
Safety equipment:
- Clear workspace for press-fitting bearings
What You Need to Prepare
- Pre-build one kit to understand assembly challenges, especially press-fitting bearings and achieving proper gear mesh
- Prepare visual aids for gear ratios and mechanical advantage (physical gears, bicycle, or diagrams)
- Review student guide pages on gear ratio math and compound systems
- Set up workstations with flat surfaces suitable for bearing press-fitting (table, heavy book)
- Test the code modifications in Step 13 to understand delay and steps variables
- Choose assessment approach (see page 4)
- Select extension activities if time allows (see page 4)
Quick Troubleshooting Reference
| If students struggle with... | First, check... | Then try... |
|---|---|---|
| Bearings won't press in straight | Are they using flat surfaces rather than pliers? Is the bearing aligned perpendicularly? | Use arbor press if available; apply steady, even pressure |
| Gears don't mesh properly | Are set screws backing out too far? Is the bearing fully seated on the axle? | Adjust axle position along T-slot until teeth mesh tightly without binding |
| Platform rotates too fast/slow | Have they modified delay and steps variables in code? | Increase delay (0.05 → 0.1) for slower movement; increase steps (20 → 40) for smoother motion |
| Set screws strip or crack parts | Are they over-tightening? | Tighten until snug, then stop - screws should hold firmly but not deform plastic |
1. ENGAGE
Understanding the Challenge
Learning Focus: Students understand Dr. Rodriguez's needs and identify how mechanical systems can reduce pain and maintain independence.
Suggested Activities
Client Introduction:
- Have students read Dr. Rodriguez's profile in their guide
- Consider: Empathy simulation - have students try picking up and examining small objects while wearing thick winter gloves or with hands restricted
- Discuss: What makes twisting motions specifically painful for someone with arthritis? What constraints exist beyond just physical pain?
Problem Framing:
- Guide students to articulate: "Dr. Rodriguez needs a way to view her sculptures from all angles because twisting motions cause joint pain"
- Connect to accessibility: How does this solution preserve independence and connection to passions?
- Preview: How might controlling rotation speed and power help?
Formative Assessment Ideas:
- Can students explain why slow, stable rotation matters specifically for this client?
- Do they identify the engineering challenge as balancing speed, power, and control?
- Do they see this as extending capabilities rather than replacing them?
Standards Connection: Primary: HCD #1 (Problem Framing), STEL 1Q (Research to inform design), NGSS ETS1 (Define design problems), STEL 7S (Human factors in design)
2. EXPLORE
Building & Discovering
Learning Focus: Students develop precision assembly skills and make observations about how gear interactions affect motion.
Facilitation Approach
Before Building:
- Students complete Steps 1-2 (identify components, gather tools)
- Consider: Prediction activity - "What do you think will happen when a small gear drives a large gear?"
- Review safety for press-fitting bearings and avoiding over-tightening set screws
During Building:
- Students follow detailed assembly in their guide (Steps 3-12)
- Use Essential Teaching Moments (page 2) as strategic pause points:
- Pause at Step 10-11 to discuss gear mesh and initial observations about size differences
- Pause at Step 13 to experience the speed-power trade-off firsthand
- Circulate to ensure proper bearing installation and gear alignment
- Encourage systematic problem-solving when gears don't mesh properly
Testing Phase:
- Guide systematic observation: "How does the platform move compared to the servo horn alone?"
- Consider: Measure and record rotation time for one complete turn
- Have students modify delay and steps variables to find optimal speed for Dr. Rodriguez
- Preview how gear ratios create predictable changes in motion
Formative Assessment Ideas:
- Are students achieving tight gear mesh without binding?
- Can they explain why the platform rotates slower than the servo?
- Are they making careful observations about the relationship between gear sizes and rotation speed?
- Do they troubleshoot bearing and gear alignment issues methodically?
Standards Connection: Primary: CAD 1.1 (Technical vocabulary), CAD 1.2 (Assembly/fabrication), NGSS Practice 3 (Planning investigations), STEL 2M (Systems thinking), CAD 2.4 (Geometric analysis)
3. EXPLAIN
Making Sense of Concepts
Learning Focus: Students connect their hands-on experience to mechanical advantage principles, gear ratio calculations, and compound systems.
Suggested Sequence
Process the Experience:
- Reflection: "What surprised you about how the gears changed the servo's motion? Where did you problem-solve?"
- Introduce key vocabulary using completed assembly as reference: mechanical advantage, gear ratio, torque, compound gears, gear reduction
- Ground abstract ideas in what they just built: "Your drive gear has 25 teeth, your compound gear has 40 teeth - that's where the ratio comes from"
Explore Core Concepts:
- Use content from student guide's "Educational Content" section
- Mechanical Advantage: Demonstrate the speed-torque trade-off with physical examples (bicycle gears, door handles, bottle caps)
- Gear Ratios: Work through calculation examples using their actual assembly
- Compound Gears: Explain why effects multiply - trace motion through both gear pairs
- Provide visual aids: diagrams showing tooth count and rotation, real gears meshing
Teaching Strategies to Consider:
- Think-pair-share: Calculate the gear ratio for each stage in their compound system
- Annotate assembly photos with gear ratios and motion direction arrows
- Compare/contrast with direct drive systems (no gears) - when would each be appropriate?
- Identify examples of gear systems in everyday objects (can opener, hand drill, egg beater, clock)
Connect to User Needs:
- Discuss: How does slow rotation specifically address Dr. Rodriguez's arthritis?
- Analyze design trade-offs: What if she needed fast rotation? What if the platform were much heavier?
- Consider optimization: What gear ratio would be ideal for different object sizes or viewing preferences?
Formative Assessment Ideas:
- Can students define gear ratio and calculate it for their system?
- Can they explain mechanical advantage using both the trade-off concept and mathematical ratios?
- Do they connect technical features (slow, stable motion) to user benefits (pain-free viewing)?
- Can they identify when compound gears are necessary versus single-stage reduction?
Standards Connection: Primary: CAD 1.4 (Explain technical solutions), HCD #2 (Communicate with stakeholders), NGSS Cross-Cutting Concepts (Cause and effect; Systems and system models), NGSS Practice 5 (Using mathematics), STEL 2S (Quantify technical concepts)
4. ELABORATE
Extension & Application
Learning Focus: Students apply gear ratio concepts to new contexts, optimize designs, or explore related mechanical systems.
Choose based on available time, student readiness, and learning priorities
Option A: Optimize for Different Use Cases
What Students Do: Calculate and propose gear ratios for different client needs (faster rotation for photography, extremely slow for time-lapse, high torque for heavy objects)
Skills Developed: Mathematical modeling, contextual reasoning, constraint management
Time Estimate: 30-45 minutes
Option B: Reverse Engineering Challenge
What Students Do: Examine everyday gear systems (hand drill, can opener, mechanical clock, egg beater) to identify gear ratios and explain their purpose
Skills Developed: Systems analysis, transfer of knowledge, identifying design intent
Time Estimate: 40-60 minutes
Option C: CAD Design Challenge
What Students Do: Design a custom gear set with specific ratio requirements using CAD software, ensuring proper tooth profiles and mesh
Skills Developed: CAD modeling, parametric design, manufacturing considerations
Time Estimate: 60-90 minutes
Option D: Speed and Torque Testing
What Students Do: Systematically test different gear configurations, measuring rotation speed and maximum load capacity to validate gear ratio predictions
Skills Developed: Experimental design, data collection and analysis, validating mathematical models
Time Estimate: 45-75 minutes
Option E: Assistive Technology Research
What Students Do: Research mechanical advantage in other assistive devices (wheelchairs, walkers, adaptive utensils) and present findings on how gear systems or leverage improve accessibility
Skills Developed: Research skills, making broader connections, recognizing design patterns
Time Estimate: 45-60 minutes
5. EVALUATE
Demonstrating Learning
Learning Focus: Students demonstrate competency in gear system design and explain mechanical advantage principles.
Recommended Assessment: Technical Explanation with Calculation
What Students Do: Successfully build the gear system, calculate the total gear reduction, and explain how the design addresses Dr. Rodriguez's needs
What You Assess:
- Assembly accuracy and proper gear mesh
- Correct gear ratio calculations for their system
- Clear explanation of speed-torque trade-off
- Connection between technical features and user benefits
Alternative Assessment Options
Option 2: Design Proposal Portfolio
Students document their process including initial observations, gear ratio calculations, code modifications, and reflection on how their system serves Dr. Rodriguez. Portfolio includes annotated photos, calculation work, and analysis of trade-offs.
Option 3: Comparative Analysis
Students compare their gear system to a direct-drive system (servo alone) and another everyday gear system, analyzing when each approach is appropriate based on speed, torque, and control requirements.
Reflection Prompts
Choose 2-3 based on your learning priorities
- Process: What was your biggest challenge in achieving proper gear mesh? How did you solve it?
- Concept: Explain the speed-torque trade-off to someone who's never heard of it. Use your gear system as an example.
- Impact: How does slow, stable rotation specifically improve Dr. Rodriguez's quality of life? What makes this solution effective for her needs?
- Transfer: Where else could you apply compound gear reduction? What problem would it solve?
- Growth: What surprised you most about how gears change motion? What do you want to learn more about?
Standards Connection: Assessment should provide evidence of: CAD 1.1-1.2, 1.4 (Technical vocabulary, assembly, explanation), HCD #2 (Stakeholder communication), NGSS Practice 5 (Mathematical thinking), NGSS Cross-Cutting Concepts (Cause and effect, Structure and function), STEL 2M (Systems thinking), STEL 2S (Quantifying concepts)
APPENDIX
Sample Assessment Rubric
| Criterion | Developing | Proficient | Advanced |
|---|---|---|---|
| Assembly Accuracy | Device incomplete or gears don't mesh properly; bearings not fully seated | Device fully assembled with proper gear mesh and smooth rotation | Device assembled with precision; optimal gear alignment; evidence of troubleshooting and refinement |
| Gear Ratio Calculations | Attempts calculation but makes errors in ratios or doesn't account for compound system | Correctly calculates individual gear ratios and total system reduction | Correctly calculates all ratios, clearly shows work, validates predictions against observed performance |
| Mechanical Advantage Explanation | Describes what happens (slower rotation) but doesn't explain why or how gears create this effect | Explains speed-torque trade-off with cause-and-effect reasoning; uses gear ratio to explain change | Explains trade-off with precise technical vocabulary; connects tooth counts to specific speed/torque changes; relates to physics principles |
| User-Centered Connection | Mentions that slow rotation helps client | Explains how slow, stable rotation specifically addresses arthritis pain and viewing needs | Analyzes design trade-offs with user perspective; proposes context-specific optimizations; considers follow-up questions for client |
| Code Optimization | Code runs but rotation too fast/slow or motion jerky | Successfully modifies delay and steps variables to achieve smooth, appropriate rotation | Systematically tests multiple configurations; documents reasoning for variable choices; optimizes for both smoothness and speed |
Key Vocabulary
Mechanical Advantage: A system's ability to multiply force or change the type of motion, usually trading one benefit (like speed) for another (like power).
Example: The compound gear system provides mechanical advantage by reducing speed and increasing torque, allowing the servo to rotate heavier objects smoothly.
Gear Ratio: The mathematical relationship between the number of teeth on two connected gears, which determines how much speed and torque change between them.
Example: When the 25-tooth drive gear connects to the 40-tooth compound gear, the gear ratio is 25:40 or 5:8, meaning the larger gear rotates slower.
Torque: Rotational force - the "twisting power" that makes things rotate. Higher torque means ability to rotate heavier objects or overcome more resistance.
Example: The gear system increases torque, allowing the platform to support and rotate Dr. Rodriguez's sculptures without the servo straining.
Compound Gear: A gear system with multiple gear pairs working together, where effects multiply rather than add to create dramatic speed or torque changes.
Example: Your assembly uses compound gears - the compound gear receives motion from the drive gear and transmits it to the platform gear, multiplying the speed reduction.
Gear Mesh: The proper engagement of teeth between two gears, where they fit together tightly without binding or having too much space.
Example: In Step 10, you adjusted the bearing axle position until the compound gear achieved proper mesh with the drive gear.
APPENDIX
Complete Standards Alignment
CAD Competencies
| Code | Competency | Where Addressed | How to Emphasize |
|---|---|---|---|
| CAD 1.1 | Technical vocabulary | Phase 2 (Building Steps 3-12), Phase 3 (Explain) - Introduce gear, bearing, mesh, torque, mechanical advantage, compound gear, gear ratio with assembly as reference | Have students create annotated diagrams labeling all components; use vocabulary in verbal explanations; create glossary entries with examples from their build |
| CAD 1.2 | Assembly/fabrication | Phase 2 (Building Steps 3-12) - Press-fitting bearings, tapping threads, achieving proper gear mesh, securing with set screws | Observe technique during bearing installation and gear alignment; emphasize precision and methodical assembly; assess completed assembly for proper function |
| CAD 1.3 | Technical documentation | Phase 5 (Evaluate) - Portfolio option documenting assembly process, calculations, and modifications | Provide documentation templates; emphasize clarity and appropriate detail level; include photos, calculations, and written explanations |
| CAD 1.4 | Explain technical solutions | Phase 3 (Explain), Phase 5 (Evaluate) - Explaining how gear ratios create slow rotation; connecting mechanics to user needs | Use sentence frames requiring technical vocabulary; require explanations that connect cause (gear size) to effect (rotation speed); present to peers or mock clients |
| CAD 2.4 | Geometric analysis | Phase 2 (Steps 10-11), Teaching Moment #1 - Understanding spatial relationships between gears, analyzing mesh quality, predicting motion paths | Discuss clearances and interferences; have students predict rotation direction through compound system; identify why proper alignment matters |
HCD Skills & Tools
| Code | Skill/Tool | Where Addressed | How to Emphasize |
|---|---|---|---|
| HCD #1 | Problem Framing | Phase 1 (Engage) - Analyzing Dr. Rodriguez's challenge from multiple perspectives (medical, functional, emotional) | Use empathy simulation; discuss root causes vs. symptoms; consider systemic factors like aging and independence |
| HCD #2 | Stakeholder Communication | Phase 3 (Explain), Teaching Moment #4, Phase 5 (Evaluate) - Explaining technical features in user-friendly terms; connecting mechanics to benefits | Practice translating "slow gear rotation" into "pain-free viewing"; focus on outcomes not just specifications |
| HCD #8 | Iteration Cycles | Phase 2 (Testing Step 13) - Modifying code variables to optimize rotation speed; adjusting gear mesh for smooth operation | Emphasize that testing reveals opportunities; document what worked and what needed adjustment; explain reasoning for changes |
NGSS Science & Engineering Practices
| Code | Practice | Where Addressed | How to Emphasize |
|---|---|---|---|
| Practice 1 | Define design problems | Phase 1 (Engage) - Defining the challenge of providing pain-free viewing with specific criteria (slow, stable, accessible control) | Frame as engineering problem with measurable criteria; discuss constraints from servo capabilities and user needs |
| Practice 5 | Using mathematics and computational thinking | Phase 3 (Explain), Teaching Moment #2, Extension Options A and D - Calculating gear ratios; predicting total reduction; analyzing speed-torque relationship | Work through ratio calculations step-by-step; connect numbers to physical meaning; use equations to predict performance |
NGSS Core Ideas
| Code | Core Idea | Where Addressed | How to Emphasize |
|---|---|---|---|
| ETS1 | Engineering Design | Throughout - especially Phase 1 (defining problem), Phase 4 (optimization extensions), Phase 5 (evaluation) | Emphasize iterative process; discuss how criteria guide design; analyze trade-offs between speed and torque |
| ETS2 | Links Among Engineering, Technology, Science, and Society | Phase 1 (Client context), Teaching Moment #4, THE BIGGER PICTURE - Understanding how gear systems address arthritis challenges | Discuss how technology extends capabilities; consider broader impacts on independence and quality of life; connect physics principles to human needs |
NGSS Cross-Cutting Concepts
- Cause and Effect: Phase 2-3, Teaching Moment #1 - Gear size ratios directly determine speed and torque changes; students observe predictable relationships
- Systems and System Models: Phase 2-3, Teaching Moment #3 - Compound gear train as interconnected system where each stage affects the next; mathematical models predict behavior
- Structure and Function: Phase 3 (Explain) - Physical structure (tooth count, gear diameter) enables specific function (speed reduction); form follows function in gear design
- Scale, Proportion, and Quantity: Teaching Moment #2, Phase 3 - Gear ratios as proportional relationships; quantitative analysis of speed-torque trade-off
STEL Standards
| Code | Standard | Where Addressed | How to Emphasize |
|---|---|---|---|
| STEL 2M | Systems (inputs, processes, outputs, feedback) | Phase 2 (Testing), Teaching Moment #3 - Input (button press), process (servo rotation through compound gears), output (slow platform rotation) | Explicitly label system components; trace signal/motion flow through entire system; discuss how each stage transforms motion |
| STEL 2S | Quantify technical concepts | Phase 3 (Explain), Teaching Moment #2, Extensions A and D - Calculating gear ratios; measuring rotation speed; quantifying torque increase | Connect calculations to real performance; use numbers to make design decisions; validate mathematical predictions with measurements |
| STEL 3B | Simple technologies combined to form complex systems | Phase 2-3, Teaching Moment #3 - Servo motor + gears + bearings + frame = complete rotation system | Identify individual components; discuss how integration creates new capabilities; show how whole exceeds sum of parts |
| STEL 7S | Human factors in design | Phase 1 (Engage), Teaching Moment #4, Phase 3 (connecting features to needs) - Designing for arthritis limitations; considering pain, fatigue, and user control preferences | Center user needs in all discussions; analyze how technical features address specific human factors; consider cognitive and physical limitations |
Sample Assessment Rubric
Technical Explanation with Calculation - Gear Systems
| Criterion | Developing | Proficient | Advanced |
|---|---|---|---|
| Assembly Accuracy | Device incomplete or gears don't mesh properly; bearings not fully seated | Device fully assembled with proper gear mesh and smooth rotation | Device assembled with precision; optimal gear alignment; evidence of troubleshooting and refinement |
| Gear Ratio Calculations | Attempts calculation but makes errors in ratios or doesn't account for compound system | Correctly calculates individual gear ratios and total system reduction | Correctly calculates all ratios, clearly shows work, validates predictions against observed performance |
| Mechanical Advantage Explanation | Describes what happens (slower rotation) but doesn't explain why or how gears create this effect | Explains speed-torque trade-off with cause-and-effect reasoning; uses gear ratio to explain change | Explains trade-off with precise technical vocabulary; connects tooth counts to specific speed/torque changes; relates to physics principles |
| User-Centered Connection | Mentions that slow rotation helps client | Explains how slow, stable rotation specifically addresses arthritis pain and viewing needs | Analyzes design trade-offs with user perspective; proposes context-specific optimizations; considers follow-up questions for client |
Key Vocabulary
Students should be able to define and use these terms:
Mechanical Advantage: A system's ability to multiply force or change the type of motion, usually trading one benefit (like speed) for another (like power).
Example: The compound gear system provides mechanical advantage by reducing speed and increasing torque, allowing the servo to rotate heavier objects smoothly.
Gear Ratio: The mathematical relationship between the number of teeth on two connected gears, which determines how much speed and torque change between them.
Example: When the 25-tooth drive gear connects to the 40-tooth compound gear, the gear ratio is 25:40 or 5:8, meaning the larger gear rotates slower.
Torque: Rotational force - the "twisting power" that makes things rotate. Higher torque means ability to rotate heavier objects or overcome more resistance.
Example: The gear system increases torque, allowing the platform to support and rotate Dr. Rodriguez's sculptures without the servo straining.
Compound Gear: A gear system with multiple gear pairs working together, where effects multiply rather than add to create dramatic speed or torque changes.
Example: Your assembly uses compound gears - the compound gear receives motion from the drive gear and transmits it to the platform gear, multiplying the speed reduction.
Gear Mesh: The proper engagement of teeth between two gears, where they fit together tightly without binding or having too much space.
Example: In Step 10, you adjusted the bearing axle position until the compound gear achieved proper mesh with the drive gear.
Bearing: A mechanical component that reduces friction and allows smooth rotation around an axis.
Example: The 605ZZ bearings press-fit into the gears allow them to spin smoothly on the bearing axles with minimal friction.
T-Slot Framing: A modular structural system with T-shaped channels that allow components to slide and lock at any position along the frame.
Example: The servo mounts and bearing axles slide into the T-slot frame and lock with set screws, allowing precise adjustment of gear positions.
Set Screw: A threaded fastener that locks components in position by tightening against them, often used in adjustable assemblies.
Example: Set screws secure the bearing axles at the correct position along the T-slot frame to maintain proper gear mesh.
Notes & Customization
What Worked in My Class:
[Space for teacher notes]
Adaptations I Made:
[Space for teacher notes]
Student Insights or Innovations:
[Space for teacher notes]
Timing Notes:
[Space for teacher notes - assembly time, testing time, concept exploration time]
For Next Time:
[Space for teacher notes]